Before any trip, better check your equipment
Tools, AWS services and third-party frameworks that speed up different parts of the process.
AWS CodePipeline
AWS Amplify
Serverless Framework
Terraform
After reading the first part of this series, you should have a general idea about the business and technical goals that have a direct impact on the choice of event-based architecture. This time, I am going to cover tools, AWS services and third-party frameworks that speed up different parts of the process. I will also show you some values we got and problems we came across.
Equipment
Basically,we’ve collected tools that are used during event-based scenarios (serverless for some people) in one bag called “BaseGear”:
- Serverless Framework
- Terraform/Terragrunt
- CI/CD pipeline for serverless/terragrunt deployments — designed and implemented by our teammate, Magda
- Amplify
- Vue.js
Serverless Framework
We have already featured the core functionality of the Serverless Framework in one of our previous articles, so we’ll skip the introductions here. However, let me give you some advice that will, hopefully, be valuable to you:
- We always build separate folders per microservice, per needed lambda layer, and create a new “serverless project” within that. This particular project had the following structure:
.├── customer-bango-backend├── customer-bango-algorithm-equipment-layer├── customer-bango-aws-custom-logging-layer├── customer-bango-aws-ssm-cache-layer├── customer-bango-frontend└── customer-bango-image-terragrunt
.├── README.md├── algorithms-service├── analysis-service├── system-health-service└── terraform
.├── files├── functions├── messages├── node_modules├── package-lock.json├── package.json├── requirements.txt├── resources├── serverless.yml└── tests
We try to separate databases, s3 buckets definitions from serverless stack especially on “prod” environment. We try to put such services together with the rest. We call them static resources and define them via Terraform code. Serverless Framework has got CloudFormation behind the scenes, so it manages your resources completely. Keep in mind that one simple mistake can accidentally delete serverless resources, like DynamoDB tables. So, either set the
DeletionPolicytoRetainor move the definition outside the stack, like we do. Better safe than sorry…Use
exclude(excludeandincludeallow you to define globs that will be excluded from the resulting artifact) to keep control over the packaging process and pack only the code you need.
exclude:- node_modules/**- .requirements/**- env/**- README.md- package.json- package-lock.json- requirements.txt- ssm_cache/**
- DynamoDB Streams definition and its
serverless.ymlproblem
layers:- arn:aws:lambda:${self:provider.region}:#{AWS::AccountId}:layer:bingo-aws-custom-logging-${self:custom.stage}:${self:custom.logging-layer-version}events:- stream: arn:aws:dynamodb:#{AWS::Region}:#{AWS::AccountId}:table/${self:custom.algorithms-tablename}/stream/2019-11-20T16:15:11.647- stream:type: dynamodbarn:Fn::GetAtt:- AlgorithmsMetadataTable- StreamArnbatchWindow: 3startingPosition: LATESTenabled: True
[!NOTE(AWS documentation)] Lambda polls shards in your DynamoDB Stream for records at a base rate of 4 times per second. When records are available, Lambda invokes your function and waits for the result. If processing succeeds, Lambda resumes polling until it receives more records.
To avoid less efficient synchronous Lambda function invocations set batchSize or batchWindow parameter. The batch size for Lambda configures the limit parameter in the GetRecords API. DynamoDB Streams will return up to that many records if they are available in the buffer, whereas the batchWindow property specifies a maximum amount of time to wait before triggering a Lambda invocation with a batch of records.
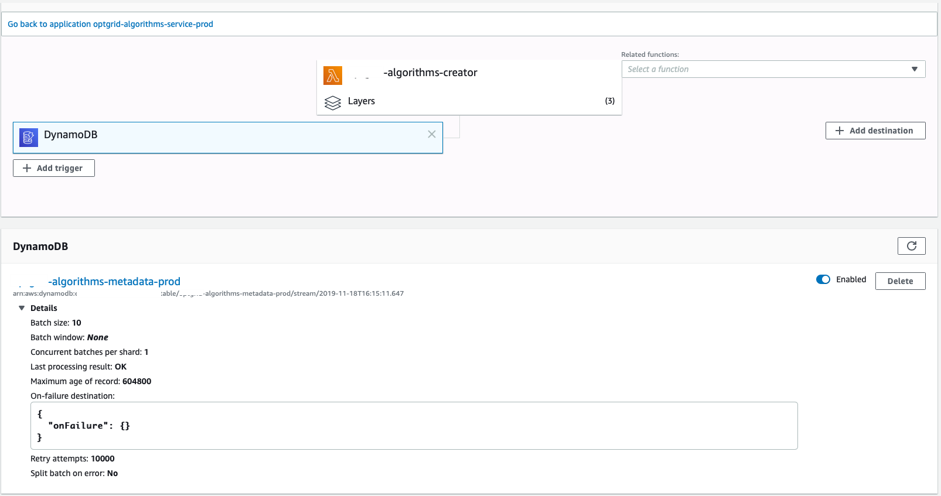
The issue with the configuration in serverless.yml is that when you use the schema presented below, it doesn’t respect the Lambda function trigger configuration seen in the AWS Console.
events:- stream:type: dynamodbarn:Fn::GetAtt: [AlgorithmsMetadataTable, StreamArn]- stream:type: dynamodbarn:Fn::GetAtt:- AlgorithmsMetadataTable- StreamArnbatchWindow: 3maximumRetryAttempts: 10startingPosition: LATESTenabled: True
We suggest moving the configuration of the DynamoDB Stream and the DynamoDB Table to a separate file in another directory. It simply helps keep the structure tidy and organized:
resources:- ${file(resources/new_algorithms_tablename.yml)}
Lambda function trigger configuration in AWS console:
- Lambda layers definition - each layer we use for Lambda functions is also defined inside the serverless file regulated with proper version variable:
layers:- arn:aws:lambda:${self:provider.region}:#{AWS::AccountId}:layer:bingo-aws-custom-logging-${self:custom.stage}:${self:custom.logging-layer-version}- arn:aws:lambda:${self:provider.region}:#{AWS::AccountId}:layer:bingo-aws-ssm-cache-${self:custom.stage}:${self:custom.ssm-cache-version}
Generally, I haven’t come across any problems with layers defined this way. However, I did notice one thing about CloudFormation containing layers’ parameter values. Let’s use real case as an example:
We published changes for selected group of Lambda functions via CloudFormation stack. Below, I pasted only the necessary part of parameters section:
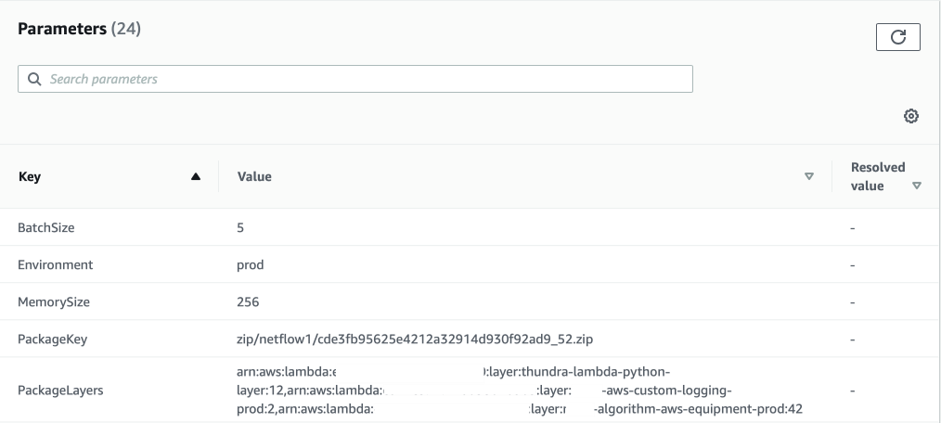
The point is that we’ve automated the whole process. We coded a function for getting the latest, available Lambda version, and then publishing a newer one accordingly. However, there is no information in AWS documentation that you can only collect last 50 versions (we had over 60 that time) via a single API call.
his led to a problem, because we thought we were publishing new function version (via def publish_new_version(self, uploadId) presented below) and re-pointing the prod alias to it. So, as you can see below, we had a situation where AWS Console version greater than 270 was available, but get_latest_published was returning only 50 items with the maximum value of 185, and that was a value the alias has been pointed to. Moreover, it has generated additional problems, because each time we’ve updated the layer version, it wasn’t seen by the Lambda function.
To sum it up, if you’ve exceeded 50 function versions, combined with aliasing, and your Lambda layers/functions updates workflows are being done via CloudFormation/Boto3, use the NextMarker.
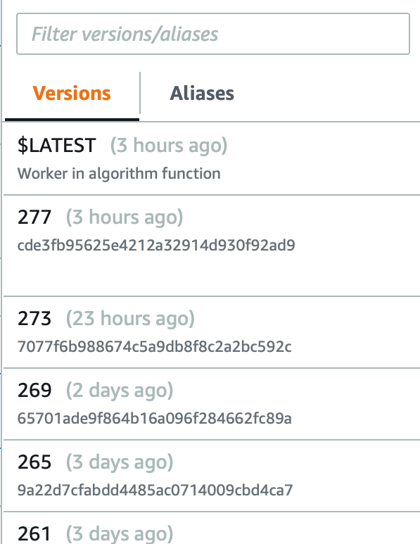
versionsPublished = ['$LATEST', '9', '13', '17', '21', '25', '29', '33', '37', '41','45', '49', '53', '57', '61', '65','69', '73', '77', '81', '85','89', '93', '97', '101', '102', '105', '109', '113', '117', '121','125', '129', '130','131', '132', '133', '137', '141', '145', '149','153', '157', '161', '165', '169', '173', '177', '181', '185']
Getting the latest version (with NewMarker key) of Lambda function, will allow you to collect more than 50 versions (especially the most recently published one) via Lambda API:
Publish new version of Lambda function:
def publish_new_version(self, uploadId):try:response = self.client.publish_version(FunctionName=self.functionName,Description=uploadId)if response['ResponseMetadata']['HTTPStatusCode'] == 201:logging.info("----Successfully published new algorithm version: {0}".format(response['Version']))return {"statusCode": 201,"body": json.dumps(response),"version": response['Version'],"published": True}else:logging.critical("----Failed to publish new algorithm version")return {"statusCode": response['ResponseMetadata']['HTTPStatusCode'],"body": json.dumps(response),"version": None,"published": False}except ClientError as err:logging.critical("----Client error: {0}".format(err))logging.critical("----HTTP code: {0}".format(err.response['ResponseMetadata']['HTTPStatusCode']))return {"statusCode": 400,"body": json.dumps(response),"version": None,"published": False}
- Definitely use serverless plugins. You can add them by
sls plugin install -n serverless-PLUGIN_NAMEor for some, like step functions:npm install serverless-step-functions
They pretty much save you development time. Just keep in mind to follow their repositories’ issues. You can see some we’ve been using below:
plugins:- serverless-python-requirements- serverless-plugin-aws-alerts- serverless-pseudo-parameters- serverless-plugin-lambda-dead-letter- serverless-step-functions
serverless-python-requirements— a Serverless v1.x plugin to automatically bundle dependencies from requirements.txt and make them available in your PYTHON PATH.serverless-plugin-aws-alerts— adds CloudWatch alarms to functions. Below, a simple example, showing how to use a default alarmfunctionErrors:
objects-processor:name: ${self:custom.app}-${self:custom.service_acronym}-objects-processorruntime: python3.6memorySize: 256reservedConcurrency: 20alarms: # Merged with function alarms- functionErrors
There are more default alarms:
alerts:alarms:- functionErrors- functionThrottles- functionInvocations- functionDuration
With following default configurations:
definitions:functionInvocations:namespace: 'AWS/Lambda'metric: Invocationsthreshold: 100statistic: Sumperiod: 60evaluationPeriods: 1datapointsToAlarm: 1comparisonOperator: GreaterThanOrEqualToThresholdtreatMissingData: missingfunctionErrors:namespace: 'AWS/Lambda'metric: Errorsthreshold: 1statistic: Sumperiod: 60evaluationPeriods: 1datapointsToAlarm: 1comparisonOperator: GreaterThanOrEqualToThresholdtreatMissingData: missingfunctionDuration:namespace: 'AWS/Lambda'metric: Durationthreshold: 500statistic: Averageperiod: 60evaluationPeriods: 1comparisonOperator: GreaterThanOrEqualToThresholdtreatMissingData: missingfunctionThrottles:namespace: 'AWS/Lambda'metric: Throttlesthreshold: 1statistic: Sumperiod: 60evaluationPeriods: 1datapointsToAlarm: 1comparisonOperator: GreaterThanOrEqualToThresholdtreatMissingData: missing
If you want, you can create your own alarm or override default alarm’s parameters. We used that in another microservice. Here’s the example:
definitions: # these defaults are merged with your definitionsfunctionErrors:period: 300 # override periodcustomAlarm:description: 'My custom alarm'namespace: 'AWS/Lambda'nameTemplate: $[functionName]-Duration-IMPORTANT-Alarm # Optionally - naming template for the alarms, overwrites globally defined onemetric: durationthreshold: 200statistic: Averageperiod: 300evaluationPeriods: 1datapointsToAlarm: 1comparisonOperator: GreaterThanOrEqualToThreshold
serverless-pseudo-parameters— you can use#{AWS::AccountId},#{AWS::Region}etc., in any of your config strings. This plugin replaces values with the proper pseudo parameter Fn::SubCloudFormation function. Example from our code:
layers:arn:aws:lambda:${self:provider.region}:#{AWS::AccountId}:layer:bingo-aws-custom-logging-${self:custom.stage}:${self:custom.logging-layer-version}
serverless-plugin-lambda-dead-letter— can assign a DeadLetterConfig to a Lambda function and optionally create a new SQS queue or SNS Topic with a simple syntax. Keeping in mind the principle that everything fails, we implement “backup forces” for our Lambdas in order to handle unprocessed events. Below, one of our functions with DLQ configured:
objects-processor:name: ${self:custom.app}-${self:custom.service_acronym}-objects-processordescription: Updates status in Dynamodb for uploaded algorithms packageshandler: functions.new_algorithms_objects_processor.lambda_handlerrole: NewAlgorithmsProcessorRoleruntime: python3.6memorySize: 256reservedConcurrency: 20alarms: # merged with function alarms- functionErrorsdeadLetter:sqs: # New Queue with these propertiesqueueName: ${self:custom.algorithms-objects-processor-dlq}delaySeconds: 10maximumMessageSize: 2048messageRetentionPeriod: 86400receiveMessageWaitTimeSeconds: 5visibilityTimeout: 300
serverless-step-functions— basically, it simplifies the Step Functions state machines definition in a serverless project.
stepFunctions:stateMachines:PackageDelete:name: ${self:custom.app}-${self:custom.service_acronym}-package-delete-flow-${self:custom.stage}alarms:topics:alarm: arn:aws:sns:#{AWS::Region}:#{AWS::AccountId}:${self:custom.app}-${self:custom.service_acronym}-package-delete-flow-alarmmetrics:- executionsTimeOut- executionsFailed- executionsAborted- executionThrottledevents:- http:path: ${self:custom.api_ver}/algorithmmethod: deleteprivate: truecors:origin: "*"headers: ${self:custom.allowed-headers}origins:- "*"response:statusCodes:400:pattern: '.*"statusCode":400,.*' # JSON responsetemplate:application/json: $input.path("$.errorMessage")200:pattern: "" # Default response methodtemplate:application/json: |{"request_id": '"$input.json('$.executionArn').split(':')[7].replace('"', "")"',"output": "$input.json('$.output').replace('"', "")","status": "$input.json('$.status').replace('"', "")"}request:template:application/json: |{#set($algorithmId = $input.params().querystring.get('algorithmId'))#set($uploadVersion = $input.params().querystring.get('uploadVersion'))#set($sub = $context.authorizer.claims.sub)#set($x-correlation-id = $util.escapeJavaScript($input.params().header.get('x-correlation-id')))#set($x-session-id = $util.escapeJavaScript($input.params().header.get('x-session-id')))#set($x-user-agent = $util.escapeJavaScript($input.params().header.get('User-Agent')))#set($x-host = $util.escapeJavaScript($input.params().header.get('Host')))#set($x-user-country = $util.escapeJavaScript($input.params().header.get('CloudFront-Viewer-Country')))#set($x-is-desktop = $util.escapeJavaScript($input.params().header.get('CloudFront-Is-Desktop-Viewer')))#set($x-is-mobile = $util.escapeJavaScript($input.params().header.get('CloudFront-Is-Mobile-Viewer')))#set($x-is-smart-tv = $util.escapeJavaScript($input.params().header.get('CloudFront-Is-SmartTV-Viewer')))#set($x-is-tablet = $util.escapeJavaScript($input.params().header.get('CloudFront-Is-Tablet-Viewer')))"input" : "{ \"id\": \"$algorithmId\", \"uploadVersion\": \"$uploadVersion\", \"contextid\": \"$context.requestId\", \"contextTime\": \"$context.requestTime\", \"sub\": \"$sub\",\"x-correlation-id\": \"$x-correlation-id\",\"x-session-id\": \"$x-session-id\", \"x-user-agent\": \"$x-user-agent\",\"x-host\": \"$x-host\", \"x-user-country\": \"$x-user-country\", \"x-is-desktop\": \"$x-is-desktop\", \"x-is-mobile\": \"$x-is-mobile\", \"x-is-smart-tv\": \"$x-is-smart-tv\", \"x-is-tablet\": \"$x-is-tablet\"}","stateMachineArn": "arn:aws:states:#{AWS::Region}:#{AWS::AccountId}:stateMachine:${self:custom.app}-${self:custom.service_acronym}-package-delete-flow-${self:custom.stage}"}definition: ${file(resources/new_algorithms_package_delete_stepfunctions.yml)}
definition: part contains YAML file with particular states configurations. I do prefer to configure it this way instead of putting the whole code in the serverless.yml file.
├── files├── functions├── messages├── node_modules├── package-lock.json├── package.json├── requirements.txt├── resources├── new_algorithms_package_delete_stepfunctions.yml├── serverless.yml└── tests
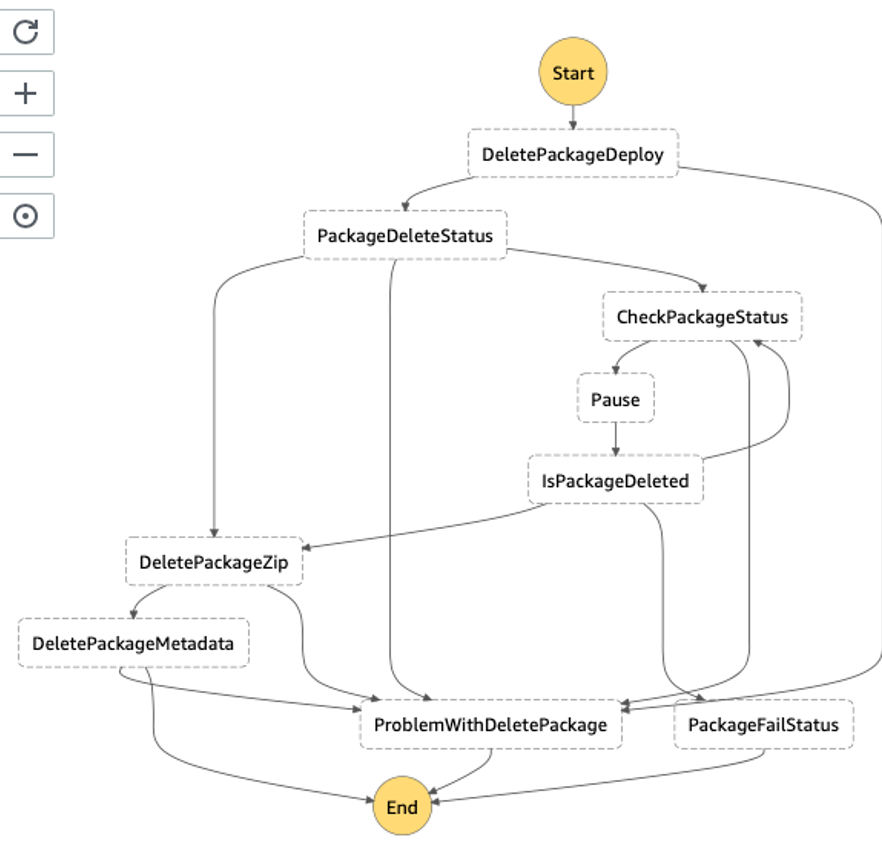
After the deployment,we got the diagram shown below. As you can see, the loop has been used in order to wait for the result returned from the CloudFormation stack. Basically, it allows you to get rid of sync calls and react, depending on the returned status from another service.
Terraform/ Terragrunt
I am pretty sure each of you knows these tools, so I’ll add only a short annotation. Generally, there are some talks about Terragrunt necessity. According to the description from their repo, “Terragrunt is a thin wrapper for Terraform that provides extra tools for working with multiple Terraform modules”. Therefore, do not expect Terragrunt to wrap up all the issues you have with terraform. Personally, I like it for the way it organizes the repo:
├── aws│ └── eu-west-1│ ├── deployments-terragrunt│ │ └── terraform.tfvars│ ├── docker-images-terragrunt│ │ └── terraform.tfvars│ ├── frontend-build│ │ └── terraform.tfvars│ ├── terraform.tfvars│ └── website│ └── terraform.tfvars├── deployment│ └── buildspec.yml└── modules├── aws-tf-codebuild├── aws-tf-codebuild-multisource├── aws-tf-codepipeline-base├── aws-tf-codepipeline-github├── aws-tf-codepipeline-multisource├── aws-tf-ecr├── aws-tf-lambda├── aws-tf-s3-host-website├── aws-tf-tags├── image-builder├── multisource-pipeline└── terragrunt-deployments
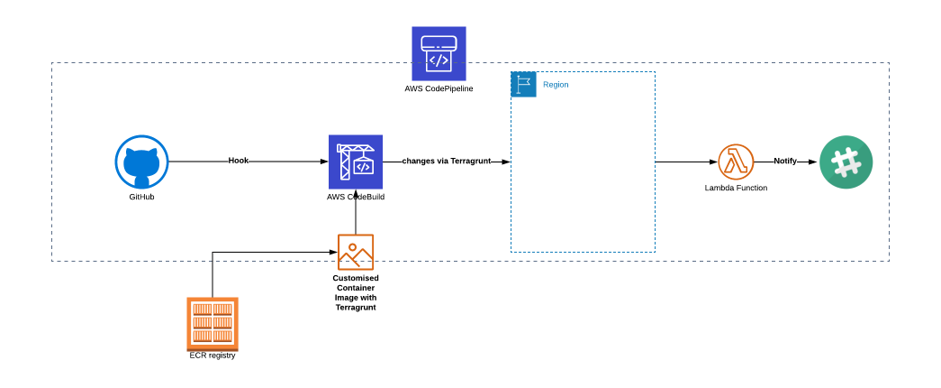
Then, with a simple terraform.tfvars, you can set variables used in particular terraform modules located in source="../../../modules/", and with a specified module/product you want to use. Our example depicts a CI/CD pipeline for terraform infrastructural changes built on top the CodePipeline + CodeBuild + Lambda Notification (terragrunt-deployments).
terragrunt {# Include all the settings from the root .tfvars fileinclude {path = "${find_in_parent_folders()}"}terraform {source = "../../..//modules/terragrunt-deployments"}}aws_region = "eu-west-2"ecr_repository_name = "terragrunt-images-prod"ecr_repository_arn = "arn:aws:ecr:eu-west-2:xxxxxx:repository/terragrunt-imgs-prod"owner = "chaosgears"# ---------------------------------------------------------------------------------------------------------------------# CODEPIPELINE module parameters# ---------------------------------------------------------------------------------------------------------------------stage = "prod"app = "bingo"info = "terragrunt-deployments"service = "algorithms"ssm_key = "alias/aws/ssm"stage_1_name = "Source"stage_1_action = "GitHub"stage_2_name = "Terragrunt"stage_2_action = "Terragrunt-Deploy"stage_3_name = "Notify"stage_3_action = "Slack"repository_owner = "chaosgears"repository = "bingo-backend"branch = "prod"artifact = "terragrunt"# ---------------------------------------------------------------------------------------------------------------------# CODEBUILD module parameters# ---------------------------------------------------------------------------------------------------------------------versioning = "true"force_destroy = "true"artifact_type = "CODEPIPELINE"cache_type = "S3"codebuild_description = "Pipeline for Terragrunt deployment"compute_type = "BUILD_GENERAL1_SMALL"codebuild_image = "xxxxx.dkr.ecr.eu-west-2.amazonaws.com/bingo-terra-imgs-prod:xxx"codebuild_type = "LINUX_CONTAINER"source_type = "CODEPIPELINE"buildspec_path = "./terraform/deployment/buildspec.yml"environment_variables = [{"name" = "TERRAGRUNT_PIPELINE""value" = "frontend-build"}, {"name" = "TERRAGRUNT_REGION""value" = "eu-west-2"}, {"name" = "TERRAGRUNT_ENVIRONMENT""value" = "prod"}, {"name" = "TERRAGRUNT_COMMAND""value" = "terragrunt apply -auto-approve"}]
An attentive reader might have noticed the buildspec_path = "./terraform/deployment/buildspec.yml" statement. In this particular case, we used it as a source buildspec file for CodeBuild that is invoking Terragrunt commands and making changes in the environment.
version: 0.2env:parameter-store:CODEBUILD_KEY: "/algorithms/prod/deploy-key"phases:install:commands:- echo "Establishing SSH connection..."- mkdir -p ~/.ssh- echo "$CODEBUILD_KEY" > ~/.ssh/id_rsa- chmod 600 ~/.ssh/id_rsa- ssh-keygen -F github.com || ssh-keyscan github.com >>~/.ssh/known_hosts- git config --global url."git@github.com:".insteadOf "https://github.com/"- pip3 --version- pip --versionpre_build:commands:- echo "Looking for working directory..."- cd terraform/aws/$TERRAGRUNT_REGION/$TERRAGRUNT_PIPELINE- rm -rf .terragrunt-cache/build:commands:- echo "Show Terraform plan output"- terragrunt plan- echo "Deploying Terragrunt functions..."- echo "Running $TERRAGRUNT_COMMAND for $TERRAGRUNT_PIPELINE pipeline."- $TERRAGRUNT_COMMANDpost_build:commands:- echo "Terragrunt deployment completed on `date`"
Is it packed already? Next stop “serverless architecture”
So far, I’ve covered tools we use to make things easier and those that save us time. Nonetheless, I would deceive you and blur the reality if I was to say that they work out-of-the-box. For me and my team, it’s all about the estimation; how much time we need to start using new tool effectively, and how much time we save by using a particular tool. Business doesn’t care about tools, it cares about time. My advice is, don’t bind yourself to tools but rather to the question: “what/how much will I achieve if I use it”. Roll up your sleeves, more chapters are on the way…
