CI/CD on AWS: Client requirements and how we resolved all challenges
More about client requirements, current situation and limitations
AWS CodeBuild
Amazon EC2
AWS CodePipeline
Amazon S3
Hello, welcome to the next part of the article about serverless pipelines which we implemented for one of our clients to automate configuration management of EC2 instances. In the first chapter we’ve quickly went through AWS native services, their specification and options that allow us to extend them. In the second one, called “Client requirements and how we overcame all challenges with CI/CD in AWS”, we would like to demonstrate a specific use case and talk more about client requirements, current situation and limitations. Here, we will go through every challenge, explain what solutions we used to resolve all problems and why we made such a choice.
Client requirements
First, let’s take a look at the current situation in the project and our requirements.
Our client took his first steps as a startup a few years ago. He grew with time — as his application.
Currently, it is receiving 10 million requests per day, and all that traffic is distributed to 5 AWS regions, 10 EC2 instances and 2 AWS accounts (DEV and PROD).

Client applications are spread cross 5 AWS regions (N. Virginia, Canada, Sydney, Frankfurt and Ireland).
Although almost all the Infrastructure was defined as code, provisioning was managed from local computers. What else is missing here? We had to resolve few problems, namely:
- No automation for EC2 configuration
- Errors caused by lack of consistent environment setup
- Errors caused by expired tokens while changes are being made
- Deployments taking too long
- No continuous automation
- No visibility of changes
- No notifications
- No trail informing who made a change
The budget was set for a maximum of 30 hours per month during the current development phase, for maintenance and improvement. Optimistically, we started looking for simple solutions which could be delivered as quickly as possible. And self-maintained AWS services seemed like a good fit here.
How did we solve those challenges?
Let’s have a closer look on requirements which we had to meet and how were solved our challenges.
#0 Infrastructure as code
We wanted to simplify our work as much as possible but also replicate our solution easily. That’s why we decided to define infrastructure and application configuration as code.
Which contributed to the choice of the final solution?
We were guided by the principle of simplicity. We also wanted to use something with low entry barriers (not requiring learning from the beginning). In other words, something easy to implement and manage, so you wouldn’t have to look for new people with specific skills. Budget was limited, but any commercial or open source project was allowed. More importantly, we wanted it to be actively developed.
Out of many possibilities we decided to use Terraform for storing configuration of infrastructure, and Ansible for managing our EC2 instances.
Ansible manages EC2 instances, but Terraform creates the base infrastructure first.
Why Ansible?
As we described in the previous chapter, with Ansible we’ve been able to define exactly which steps need to be executed on EC2 instance and in what order. It proves quite useful, when we have to configure operating systems and applications level components at the same time, and don’t want to mix up all the steps.
Why Terraform?
Simply put, with Terraform we can define how the final state of our infrastructure should look like. It also collects information about states and how they change with time.
#1 No automation for EC2 configuration
To resolve the first problem, we defined playbooks, roles and tasks as code for managing EC2 instances in Ansible, e.g. packaged installation, configuration of operating system, changes made in application. Every step, which needed to be executed on the instance, was defined idempotently, which means that tasks were applied multiple times without changing the result beyond the initial application. You can achieve this in Ansible by conditional operators, debug modules and other tools that check the state of specific operation.
You can find one example below, main.yml:
- name: Check OS distributionshell: awk -F\" '{print $2}' /etc/os-release | head -n 1register: os_distibution- debug:var: os_distibution.stdout_lines- name: Startup script configuration for Ubuntucopy:src: rc.localdest: /etc/rc.localowner: rootgroup: rootmode: 0644when: "'Ubuntu' in os_distibution.stdout_lines"- name: Restart network servicesystemd:name: networkingstate: restartedenabled: yeswhen: "'Ubuntu' in os_distibution.stdout_lines"
Ansible task for managing network configuration on EC2 instance.
#2 Errors caused by lack of consistent environment setup
AWS CodeBuild will be responsible for provisioning of those changes. Originally, it was responsible for building images, running tests, compiling a source code, etc. Apparently, it has a much bigger functionality. AWS CodeBuild behaves like an EC2 instance that is created when the job starts but dies with its completion. It means that you can use it as a deployment instance, but pay only for minutes while running a job.
What does this give us?
- Your builds are not going to be left waiting in a queue, because AWS CodeBuild scales continuously and processes multiple builds concurrently;
- You do not manage local volumes and memory of your tool anymore, but you can choose between 3 compute size types: 3GB - 15GB memory and 2 - 8 vCPU;
- You can predefine and use whatever docker image you need or choose self-maintained Amazon Linux 2 and Ubuntu;
- You have a consistent environment setup when you use the same image for all deployments.
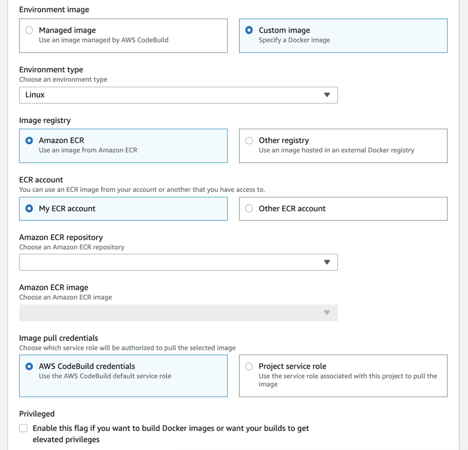
View of image configuration for CodeBuild environment.
#3 Errors caused by expired tokens while changes are being made
AWS resources just integrate very well with each other. You can grant very granular permissions to allow actions from AWS CodeBuild to ECR, CloudWatch Logs, S3 buckets, and so on and so on… using IAM roles with IAM policies.
And that means:
- You don’t need to use dedicated service users for your deployment server or bother with rotating user passwords, policies etc.;
- Your credentials are not expiring, because you don’t need to use any AWS Access Keys or Temporary Session Tokens to connect into AWS.
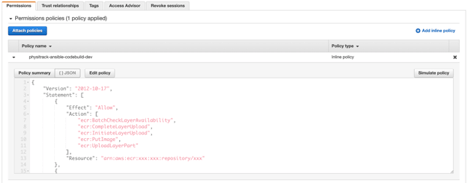
View of IAM role with attached IAM policy used by CodePipeline to allow access to other AWS services, e.g. ECR private repository.
By configuring AWS CodeBuild inside AWS network, you reduce the distance between deployment server and target hosts, and, as a consequence, you also reduce deployment delays.
In other words:
- Your deployment server can be placed close to your target servers, even in the same Virtual Private Cloud or Subnets, so you are avoiding all routers to get into AWS network and time of deployment is reduced to a minimum.
- You can place deployment server inside AWS network and avoid timeouts to other AWS services.
- If your resources need to stay in Private Network or any data can’t be transferred through the Internet you can place CodeBuild inside Private Subnet as well and communicate with other AWS services using VPC Endpoints.
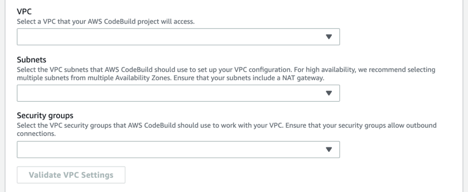
View of configuration for CodeBuild running inside VPC network.
#4 No continuous automation
To conclude this part, we decided to use webhooks.
Webhooks allow you to integrate version control systems, e.g. GitHub or BitBucket, with other tools. They work based on events and trigger some actions. Webhooks can be used to automatically update an external issue tracker, trigger CI builds, update a backup mirror, or even deploy a change to your servers.
At that point, you can configure AWS CodeBuild with various sources:
- Amazon S3 — enables you to get artifacts and packages directly from the bucket, and runs automatically when new object are uploaded;
- AWS CodeCommit — doesn’t support webhooks, but you can automate your build based on branch, tag, commit ID;
- GitHub / BitBucket — you can create one or more webhook filter groups to specify which webhook events trigger a build.
Available events: PUSH, PULL_REQUEST_CREATED, PULL_REQUEST_UPDATED, PULL_REQUEST_MERGED and PULL_REQUEST_REOPENED (GitHub only). Available filters: ACTOR_ID, HEAD_REF, BASE_REF, FILE_PATH (GitHub only).
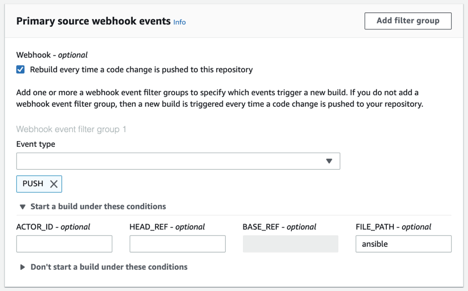
View of configuration for webhooks in CodeBuild (not used in our solution).
Unlike CodeBuild, CodePipeline allows only two detection options for starting a pipeline automatically:
- GitHub webhooks — when a change occurs in a branch,
- Scheduler — through periodic change detection checks.
#5 No change visibility
Another benefit of using AWS CodeBuild is that you can track changes of every job. You can find logs directly in AWS console inside CodeBuild project or CloudWatch Logs Group named as your project.
CloudWatch is storing all outputs from console into Log Streams and keeps them even when CodeBuild project doesn’t exist anymore. Based on that data, you can make more advanced analytics. You can also move your logs to S3 bucket and save some money by changing storage class.
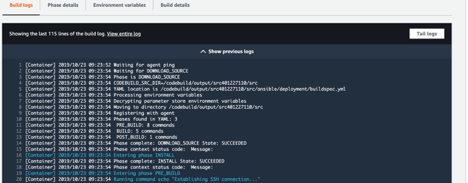
View of CodeBuild console with logs during running job.
#6 No notifications
Although CodeBuild works very comprehensively and will definitely suffice in some cases, you can always create a full complicated pipeline, instead of just a single job, using AWS CodePipeline.
CodePipeline lets you create multiple stages, sources or actions, and integrate them with various tools. Like in our example, where we used a 3-stage Pipeline:
- Source: GitHub — to get a changed code and run pipeline immediately
- Deploy: AWS CodeBuild — to deploy Ansible configuration on EC2 instances
- Notify: AWS Lambda — to send notifications to our Slack channel after deployment completes.
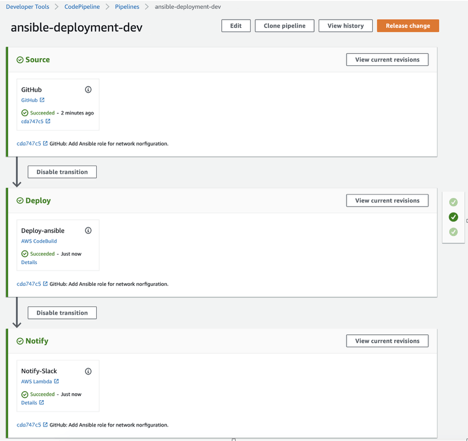
View of CodePipeline with 3 stages (source, deploy, notify).
#7 No trail informing who made a change
It was really important for us to keep control of our environment. And that meant tracking all changes and versions that were deployed. I can’t imagine working in teams with many contributors, and not using Version Control Systems.
It’s worth mentioning that even though CodeBuild integrates easily with GitHub and Bitbucket, CodePipeline can only have CodeCommit and GitHub as a source, at least for the moment (track AWS news).
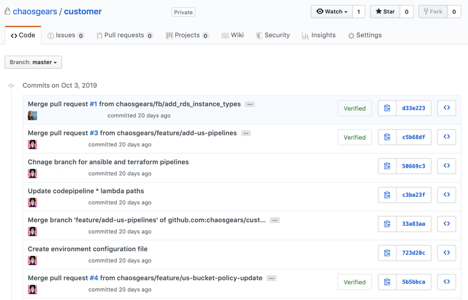
Version control system for our code — GitHub view.
The idea was to automate and speed up all manual work. We went through all problems and found a compromise between requirements, money and time spent on building our automation solution. Of course, someone can always say that this isn’t going to work for his use case. And that’s fine. Focus on what you and your project really need, not on what you would like to have.
In the third, and last, part called “Solution Architecture and implementation of serverless pipelines in AWS” we would like to go a bit deeper and show how we built our solution, and share some thoughts after using it for few months. To illustrate the final solution we will also prepare a DEMO. We will wrap things up with our conclusions based on few months of use. We will also answer to some Qs: what was good, what could be better, what we plan for the future.
Interested? See you in the next chapter.
