CI/CD on AWS: Architecture of serverless pipelines on AWS
Finishing touches to our implementation, with all of its configuration steps, in the last chapter of the series.
AWS CodePipeline
AWS CodeBuild
AWS Lambda
Hello and welcome back to the third and final part of our series about serverless pipelines and how they can be used to automate the configuration management of EC2 instances. In the previous chapter we went through client requirements and all the problems encountered, while working on the project. We also discovered what solutions can be used one very stage of the process and in which cases. Today we will talk more about the implementation, with all its configuration steps. To sum everything up, we will finish with conclusions reached after few months of use and answer some questions: what was good, what could be better, and what our plans for the future are.
Workflow process
We wanted to have a pipeline enhanced with notification directly to Slack, so we created a CodePipeline with 3 stages — Source, Deploy and Notify. Our Pipeline is managing configuration of EC2 instances. Let’s have a look at the workflow.
The whole mechanism is started by a user and, more specifically, the change (event) in the Git repository, e.g. a PUSH into a specific branch.
- CodePipeline with GitHub source — getting code with Ansible configuration from the source,
- AWS CodeBuild — establishing connection to EC2 and deploying Ansible playbooks stored in Git repository,
- AWS Lambda — triggering Lambda function that connects to Slack, and sending notification about status of Ansible deployment to specific Slack channel.
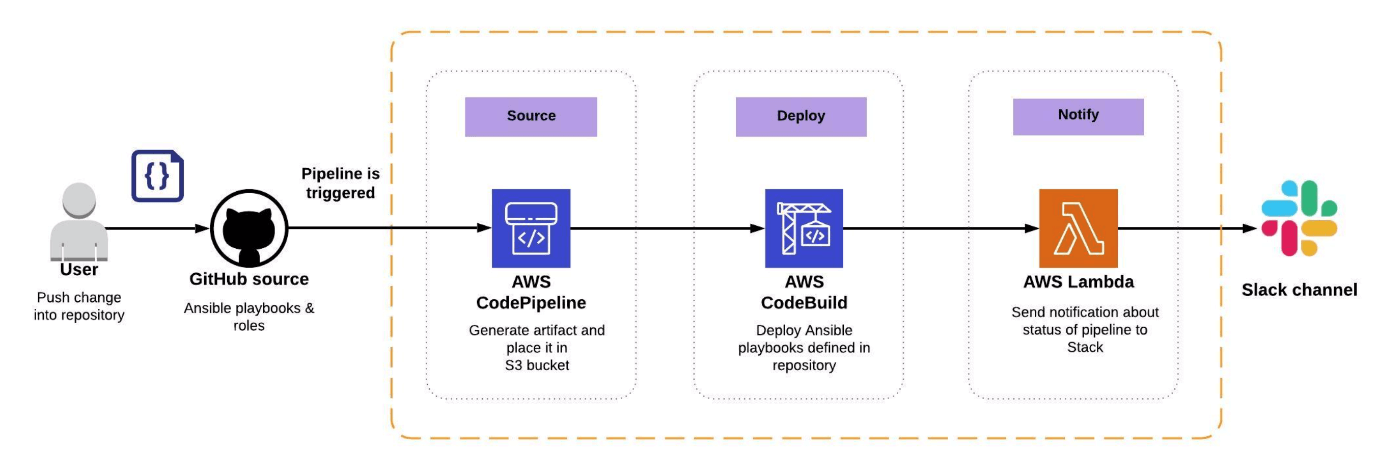
Workflow of pipeline for EC2 configuration management, using Ansible.
AWS high level design
Diagram shown below describes the main AWS services required to build a pipeline: CodeBuild, CodePipeline, ECR, S3, Systems Manager, CloudWatch and Lambda.
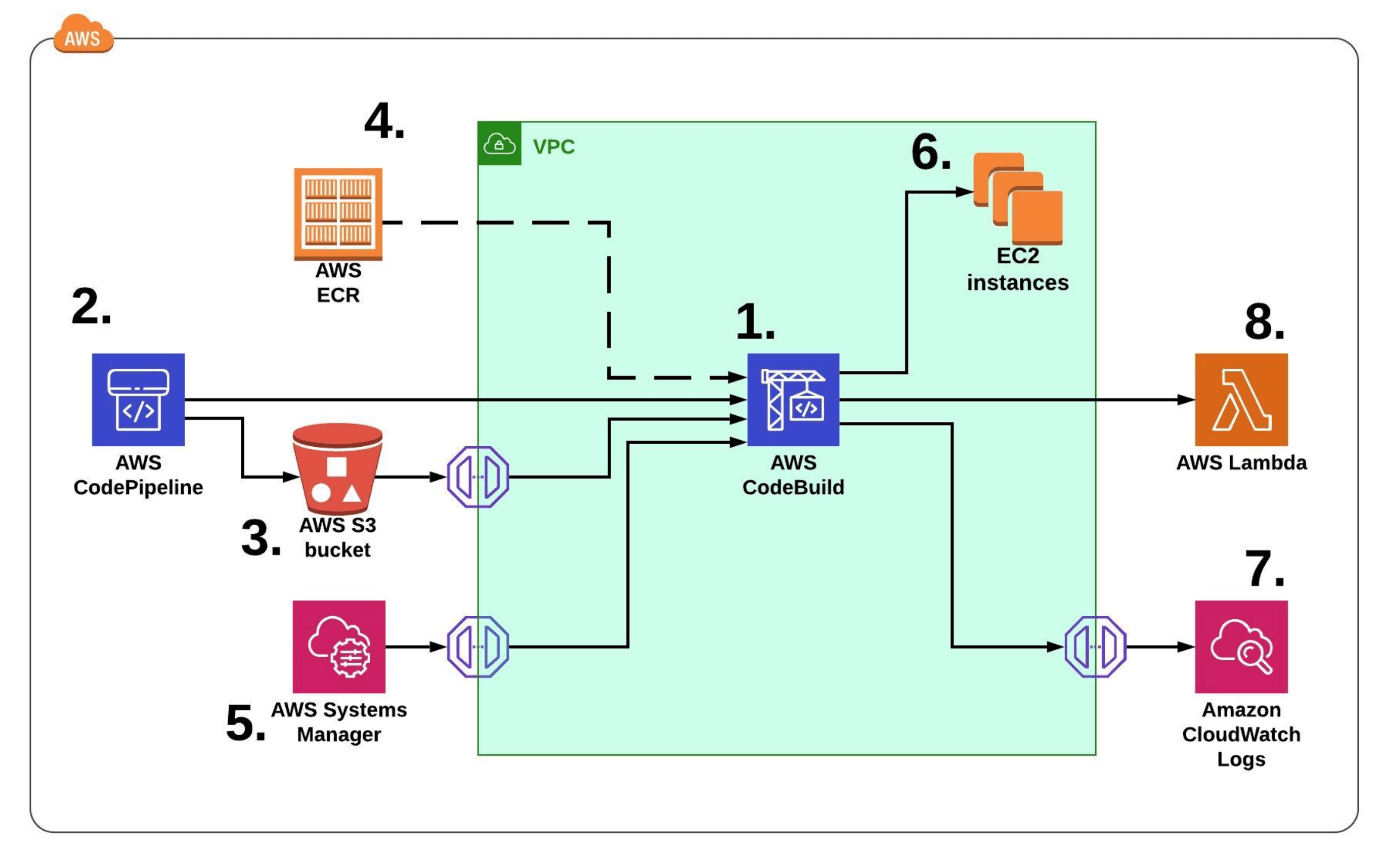
High level design of the CI/CD solution from AWS perspective.
- CodeBuild - for security purposes our EC2 instances are running only in private network. We don’t want to allow any incoming traffic from the Internet. Because of that, we placed CodeBuild in Virtual Private Cloud (VPC) as well and all integrated AWS services need to go through VPC Endpoints. In that situation, connection between build server and EC2 is enabled by Security Groups. Moreover, due to the fact that Ansible connects to EC2, using SSH, the keys must be already in place - private key on CodeBuild and public in authorized_keys file on EC2 instances.
- CodePipeline is getting a code from the source git repository and generates.
- Artifact is stored in S3 bucket. CodeBuild is pulling artifact through VPC S3 Endpoint Gateway.
- CodeBuild needs to get a proper image besides compute type. We build our own docker images in another pipeline and store them in ECR.
- SSH private key for CodeBuild is stored as a SecureString and encrypted in AWS Systems Manager (SSM) Parameter Store, and can be retrieved through SSM VPC Endpoint Interface.
- Public key needs to be already in place on EC2 instance in
~/.ssh/authorized_keysfile - During job execution, all logs are stored in CloudWatch Logs. CloudWatch Log Group is created automatically, and you can search outputs from CodeBuild console any time, even when the project doesn’t exist anymore. In that case, CodeBuild also needs to send data through VPC Endpoint Interface.
- In the last step, CodeBuild is triggering Lambda function.
Pipeline as code
CodeBuild project
Ansible playbooks are executed in CodeBuild project. This is the heart of the pipeline and its second stage.
resource "aws_codebuild_project" "build" {name = "${var.project}-${var.service}-${var.app}-${var.stage}"service_role = "${aws_iam_role.codebuild_role.arn}"description = "${var.codebuild_description}"tags = "${var.additional_tags}"artifacts {type = "${var.artifact_type}"}cache {type = "${var.cache_type}"location = "${aws_s3_bucket.codebuild.bucket}"}environment {compute_type = "${var.compute_type}"image = "${var.codebuild_image}"type = "${var.codebuild_type}"privileged_mode = "true"environment_variable = ["${var.environment_variables}"]}source {type = "${var.source_type}"buildspec = "${var.buildspec_path}"}vpc_config {vpc_id = "${var.codebuild_vpc_id}"subnets = ["${var.codebuild_subnet_id}"]security_group_ids = ["${aws_security_group.codebuild_allow_subnets.id}"]}}
Definition of CodeBuild project in Terraform.
Access to other AWS resources is granted through IAM service role. It allows us, for example, to read action on repository in ECR, create Network Interfaces in the subnet, send logs to CloudWatch Log Group and S3, get artifact from S3 and parameter from SSM, and store cache in separated S3 bucket.
All those actions are defined in the project as well. Target artifacts and cache for a project are stored in S3, the environment is using predefined image with configured Ansible from ECR. The source is an artifact generated in the first stage. Specification of the project (buildspec) is stored in a separate file, so we are pointing to that directory. And the most important part, definition specifying that our job will be running inside our VPC and private subnet. Security group is allowing only outbound access:
- HTTPS to SSM, CloudWatch Logs and S3 VPC Endpoints.
- SSH to subnets with target EC2 instances.
CodeBuild module
Module for CodeBuild is defined to create all required resources at once, and to make a project running — IAM role, Security Group, S3 bucket for cache and CodeBuild project, of course. Source can be located in the same repository or accessed remotely. In this case, we are pointing to a remote source in separated GitHub repository, released and tagged with proper version accordant to semantic versioning 2.0.0 (MAJOR.MINOR.PATCH).
module "codebuild" {source = “git::git@xxx.com:xxx/aws-tf-codebuild-vpc.git//?ref=1.2.2”aws_region = "${var.aws_region}"compute_type = "${var.compute_type}"codebuild_image = "${var.codebuild_image}"codebuild_type = "${var.codebuild_type}"source_type = "${var.source_type}"buildspec_path = "${var.buildspec_path}"ecr_repository_name = "${var.ecr_repository_name}"codepipeline_s3_arn = "${module.codepipeline.codepipeline_s3_arn}"codebuild_vpc_id = "${var.codebuild_vpc_id}"codebuild_subnet_id = "${var.codebuild_subnet_id}"ssm_ansible_key_name = "${var.ssm_ansible_key_name}"vpce_logs_security_group_id = "${data.terraform_remote_state.base_infra.logs_endpoint_sg_id}"vpce_ssm_security_group_id = "${data.terraform_remote_state.base_infra.ssm_endpoint_sg_id}"s3_prefix_list_ids = "${data.aws_vpc_endpoint.s3.prefix_list_id}"codebuild_subnet_cidr = “${data.aws_subnet.codebuild_subnet.cidr_block}"additional_tags = "${module.tags.map}"}
Calling the CodeBuild module in Terraform.
The basic infrastructure with VPC Endpoints configuration is defined in a separate stack (VPC and S3 Endpoint Gateway are not managed by Terraform). Our state files for stacks are stored in separated remote states on S3. Because of such structure, we can reference variables required to run that project in a several ways:
- Using stack references, by pulling output created in CodePipeline module in the same stack. Example:
${module.codepipeline.codepipeline_s3_arn} - Using Terraform Data Source for Remote States, by querying output in different remote state file for base infrastructure. Example:
${data.terraform_remote_state.base_infra.logs_endpoint_sg_id} - Using Terraform Data Source, by querying already existing resources in AWS account, not created by Terraform. Example:
${data.aws_vpc_endpoint.s3.prefix_list_id}
CodeBuild specification and environment
CodeBuild project still needs information about Ansible playbooks and where we would like to execute them. We are able to define it, using shell commands in the Buildspec file. Here, we are specifying location for Ansible configuration files, additional plugins which are dependent on the service, required parameters from AWS SSM Parameter Store (SSH keys) and the rest of the variables.
version: 0.2env:parameter-store:CODEBUILD_PRIVATE_KEY: "ansible_deployment_key"phases:pre_build:commands:- echo "Configuring SSH connection..."- echo "$CODEBUILD_PRIVATE_KEY" > ~/.ssh/ansible- chmod 600 ~/.ssh/ansible- echo "Configuring working directory..."- cp -avr ansible/. /etc/ansible/- echo "Configuring ansible inventory"- ln -s /etc/ansible/inventories/hosts /etc/ansible/hostsbuild:commands:- echo "Checking current ansible environment variables..."- source /etc/ansible/deployment/environment_variables.sh- env |grep ANSIBLE- echo "Deploying ansible $ANSIBLE_PLAYBOOK.yml playbook on $ANSIBLE_TARGET_HOST...”- ansible-playbook /etc/ansible/playbooks/$ANSIBLE_PLAYBOOK.yml -l $ANSIBLE_TARGET_HOST --key-file ~/.ssh/ansiblepost_build:commands:- echo "Ansible deployment completed on `date`"
Buildspec file of CodeBuild project for Ansible playbooks execution.
Now, it’s important to remember that CodeBuild doesn’t allow functionality for variables like drop down list, only simple text field, at least for now. It doesn’t mean that this will not change in the future, but at the moment we had to work with a shell script that exports environment variables for us.
export ANSIBLE_PLAYBOOK="diagnostics"export ANSIBLE_TARGET_HOST="staging"echo "New variables exported."
Shell script for managing environment variables.
CodePipeline
Order of pipeline stages is defined by CodePipeline. It allows multiple sources, actions and stages, simultaneously or transiently, depending on your needs.
Our pipeline was created in 3 steps. For each of them CodePipeline required proper permissions defined in IAM role like:
- Write access to S3 bucket to store artifact
- Start action of CodeBuild project with Ansible playbooks
- Invoke Lambda function for notification
- Get and decrypt SSM parameter with GitHub token
It is not possible to parametrize everything inside resource, amount and stage types of a pipeline has to be defined statically, like:
- Defining Source, which, in our case, is a private GitHub repository. Target branch and OAuth token are stored in AWS SSM ParameterStore.
- Referencing already created CodeBuild project for Ansible playbooks execution.
- Referencing Lambda function that is already on place with all required variables.
resource "aws_codepipeline" "pipeline" {name = "${var.project}-${var.service}-${var.app}-${var.stage}"role_arn = "${aws_iam_role.codepipeline_role.arn}"artifact_store {location = "${aws_s3_bucket.codepipeline.bucket}"type = "S3"}stage {name = "${var.stage_1_name}"action {name = "${var.stage_1_action}"category = "Source"owner = "ThirdParty"provider = "GitHub"version = "1"output_artifacts = ["${var.artifact}"]configuration {Owner = "${var.repository_owner}"Repo = "${var.repository}"Branch = "${var.branch}"OAuthToken = "${data.aws_ssm_parameter.github_token.value}"}}}stage {name = "${var.stage_2_name}"action {name = "${var.stage_2_action}"category = "Build"owner = "AWS"provider = "CodeBuild"input_artifacts = ["${var.artifact}"]version = "1"output_artifacts = ["${var.artifact}-container"]configuration {ProjectName = "${var.codebuild_proj_id}"}}}stage {name = "${var.stage_3_name}"action {category = "Invoke"name = "${var.stage_3_action}"owner = "AWS"provider = "Lambda"version = "1"input_artifacts = ["${var.artifact}-container"]configuration {FunctionName = "${var.lambda_name}"UserParameters = <<EOF{"region" : "${var.aws_region}","ecr" : "${var.ecr_repository_name}","image" : "${var.app}"}EOF}}}
Definition of CodePipeline project and stages in Terraform_
Lambda notification to Slack channel configuration
Our AWS Lambda function is using Python 3.7 runtime which, at that moment, provides boto3 - 1.9.221 botocore-1.12.221 and Amazon Linux v1 underlying environment. Besides libraries imported in pipeline_slack_notification.py script, it will also require requests package to post message into Slack channel. Message will contain information about Pipeline URL, AWS account ID, region, date, pipeline name and a commit ID with the change, as described in message.json template:
{"attachments": [{"color": "#298A08","author_name": "CodePipeline Notification Message","title": "CodePipeline URL","title_link": "to_replace","attachment_type": "default","fields": [{"title": "AccountId","value": "to_replace","short": true},{"title": "AWS Region","value": "to_replace","short": true},{"title": "Date","value": "to_replace","short": true},{"title": "Pipeline","value": "to_replace","short": false},{"title": "Commit","value": "to_replace","short": false}],"footer": "Slack API","footer_icon": "https://platform.slack-edge.com/img/default_application_icon.png"}]}
Template for message.
To get commit ID we are using commit.py function. Here AWS SDK for Python (Boto3) is looking for current CodePipeline and last execution (commit) ID.
#!/usr/bin/env python2.7# -*- coding: utf-8 -*-import loggingfrom botocore.exceptions import ClientErrorimport boto3class Commit(object):def __init__(self, pipeName):self.pipeName = pipeNametry:self.client = boto3.client('codepipeline')except ClientError as err:logging.error("----ClientError: {0}".format(err))def get_last_execution_id(self):logging.info('------Getting CodePipeline ExecutionId')try:response = self.client.list_pipeline_executions(pipelineName=self.pipeName)return response['pipelineExecutionSummaries'][0]['pipelineExecutionId']except ClientError as err:logging.error("----ClientError: {0}".format(err))def get_commit_id(self):exec_id = self.get_last_execution_id()try:response = self.client.get_pipeline_execution(pipelineName=self.pipeName,pipelineExecutionId=exec_id)logging.info('------Getting CommitId for image tagging')commitId = response['pipelineExecution']['artifactRevisions'][0]['revisionId'][0:7]return commitIdexcept ClientError as err:logging.error("----ClientError: {0}".format(err))
Python script that gets information about last commit ID used in CodePipeline.
Main function (pipeline_slack_notification.py) is taking care of sending messages to the Slack. Achieving this will require following environment variables:
aws_region— region where pipeline is placedpipeName— pipeline nameslack_channel_info— channel name on Slackslack_url_info— hook URL for Slack
What is pipeline_slack_notification.py function responsible for? In few words, getting all required information from Pipeline and the change, generating a message based on message template, and sending that message immediately to defined Slack channel.
#!/usr/bin/env python2.7# -*- coding: utf-8 -*-import jsonimport osimport datetimeimport requestsimport loggingfrom botocore.exceptions import ClientErrorfrom commit import Commitimport boto3import base64logger = logging.getLogger()logger.setLevel(logging.INFO)def decrypt(encrypted_url):region = os.environ['aws_region']try:kms = boto3.client('kms', region_name=region)plaintext = kms.decrypt(CiphertextBlob=base64.b64decode(encrypted_url))['Plaintext']return plaintext.decode()except Exception:logging.exception("Failed to decrypt URL with KMS")def import_all_data(pattern, dirname='slack_messages'):for root, subdirs, files in os.walk(dirname):for i in range(len(files)):if os.path.isfile(os.path.join(dirname, files[i])) and os.access(os.path.join(dirname, files[i]), os.R_OK) and pattern in files[i]:with open(os.path.join(dirname,files[i]),'r') as file:inputt = json.load(file)file.close()return inputtdef custom_message(payload, dirname, pattern, pipeName):message = import_all_data(pattern, dirname)now = datetime.datetime.now()user_parameters = payload['data']['actionConfiguration']['configuration']['UserParameters']decoded_parameters = json.loads(user_parameters)date_now = now.strftime('%Y-%m-%d %H:%M:%S')pipeline = Commit(pipeName)message['attachments'][0]['title_link'] = 'https://' + decoded_parameters['region'] + \'.console.aws.amazon.com/codesuite/codepipeline/pipelines/' + \os.environ['pipeName'] + \'/view?region=' + decoded_parameters['region']message['attachments'][0]['fields'][0]['value'] = payload['accountId']message['attachments'][0]['fields'][1]['value'] = decoded_parameters['region']message['attachments'][0]['fields'][2]['value'] = date_nowmessage['attachments'][0]['fields'][3]['value'] = os.environ['pipeName']message['attachments'][0]['fields'][5]['value'] = pipeline.get_commit_id()return messagedef slack_info(slack_url, slack_channel, payload, pipeName, dirname='slack_messages'):try:slack_message = custom_message(pattern='message', payload=payload, dirname=dirname, pipeName=pipeName)req = requests.post(slack_url, json=slack_message)if req.status_code != 200:print(req.text)raise Exception('Received non 200 response')else:print("Successfully posted message to channel: ", slack_channel)except requests.exceptions.RequestException as err:logging.critical("----Client error: {0}".format(err))except requests.exceptions.HTTPError as err:logging.critical("----HTTP request error: {0}".format(err))except requests.exceptions.ConnectionError as err:logging.critical("----Connection error: {0}".format(err))except requests.exceptions.Timeout as err:logging.critical("----Timeout error: {0}".format(err))class Pipeline(object):def __init__(self):try:self.code_pipeline = boto3.client('codepipeline')except ClientError as err:print("----ClientError: " + str( err ))def put_job_success(self, job, message):"""Notify CodePipeline of a successful job"""logger.info("Putting job success")self.code_pipeline.put_job_success_result(jobId=job)def put_job_failure(self, job, message):"""Notify CodePipeline of a failed job"""logger.info("Putting job failure")self.code_pipeline.put_job_failure_result(jobId=job, failureDetails={'message': message, 'type': 'JobFailed'})def lambda_handler(event, context):logger.info("Event: {0}".format(event))slack_channel = os.environ['slack_channel_info']slack_url = os.environ['slack_url_info']pipeName = os.environ['pipeName']try:job_id = event['CodePipeline.job']['id']pipe = Pipeline()data = event['CodePipeline.job']slack_info(slack_url, slack_channel, payload=data, pipeName=pipeName, dirname='slack_message')pipe.put_job_success(job_id, 'Success')except Exception as e:logging.exception(e)pipe.put_job_failure(job_id, 'Failure')
Python script that generates message and send it into Slack channel.
An example of Slack message output generated by Lambda function:
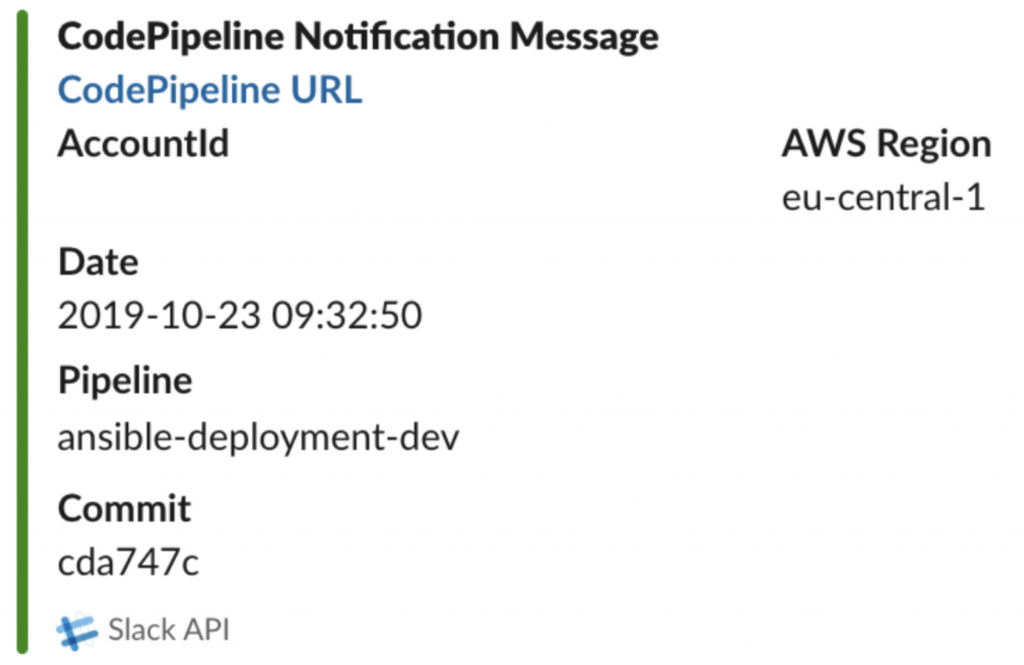
Message generated in Slack channel informing about pipeline status.
Conclusion
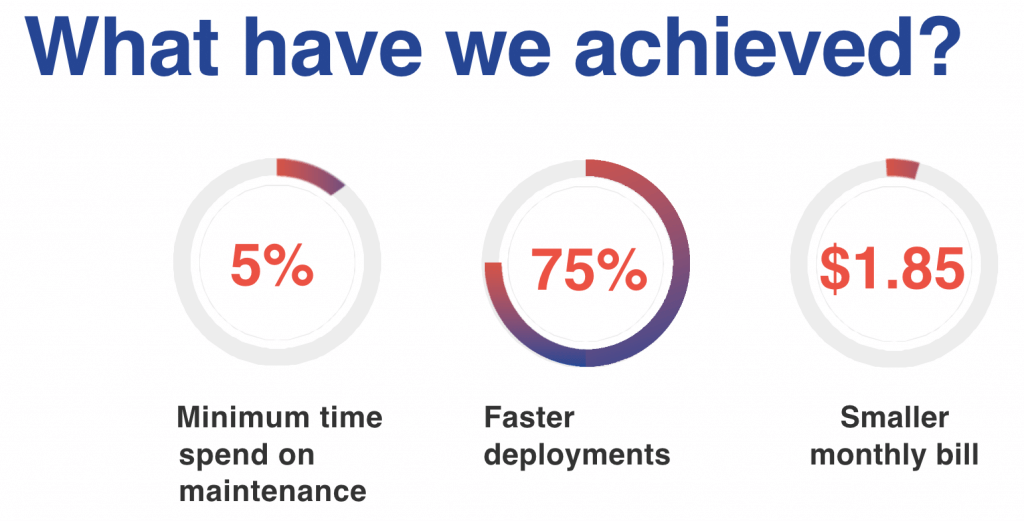
Less maintenance, much faster deployments and very small price for automation solution are not the only benefits.
Thanks to native AWS services we have limited our time for maintenance to a minimum, which resulted in rebuilding docker images and updating pipeline configuration with newer one.
Unlike local deployments, that lasted from 4 to 5 minutes and were often interrupted by environmental errors or expiring tokens, new ones were shortened to ~50 seconds.
AWS native services are self-managed. AWS assumes responsibility for providing the most up-to-date and secure solutions. You pay only for what you use, and, actually, it works exactly like this. After 5 months we are paying ~$1.85 monthly for usage of main AWS services (CodeBuild, CodePipeline and ECR) in our pipelines, summarizing 2 AWS accounts with 5 regions.
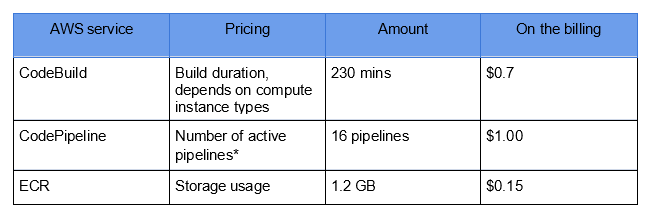
Estimation of cost for CI/CD solution using AWS services.
* Existing for more than 30 days and with at least one code change that runs through it during the month.
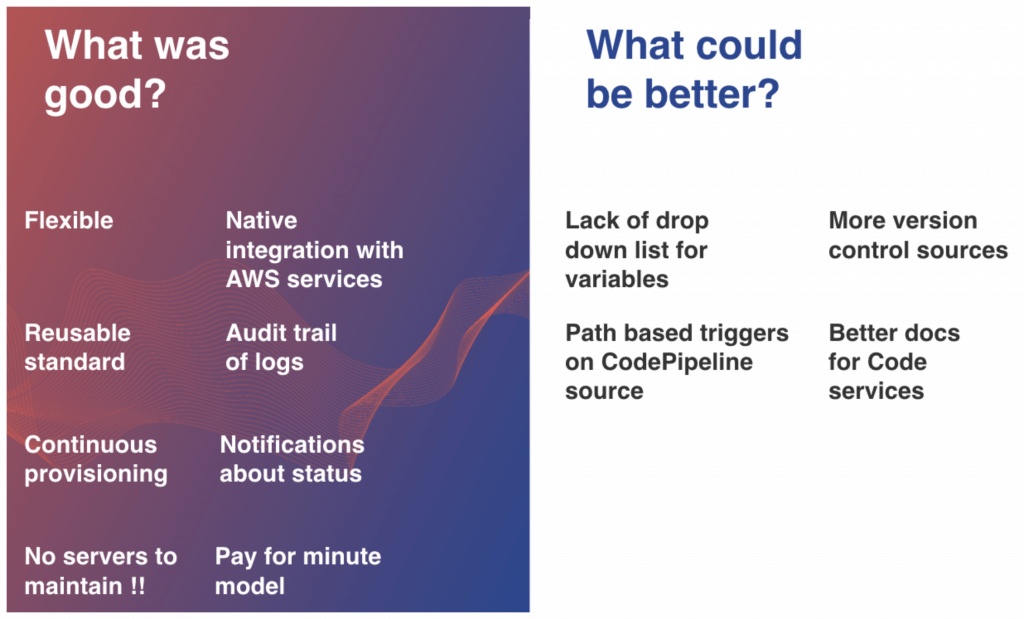
What was good?
- Flexible — CodePipeline lets us create any workflow with multiple sources, stages and even Approval actions.
- Reusable standard — AWS configuration defined as code allows us to replicate the solution in any environment.
- Continuous provisioning — Version Control Systems and S3/ECR let run pipelines automatically based on events.
- No servers to maintain — there is no managing computing layer on CodeBuild and Lambda.
- Native integration with AWS services — they authorize each other using IAM roles, no password rotation and expiring tokens anymore.
- Audit trail of logs — logs about changes and executions are quickly accessible from CodeBuild console or CloudWatch Logs, can be analyzed further or stored in S3 to save money.
- Notifications about status — Lambda’s possibilities are limitless, with better 3-party tools integration allows us to achieve any effect we need.
- Pay as you go model — no commitment, paying only for used resources.
What could be better?
- Lack of drop down list for variables — nice feature which everyone appreciated in Jenkins, here, we had to use bash script to force environment variables.
- Path based triggers on CodePipeline source — CodePipeline, unlike CodeBuild, allows only two detection options to automatically start a pipeline:
- GitHub webhooks — when change occurs in the branch.
- Scheduler — check periodically for changes.
- More version control sources — lack of BitBucket source in CodePipeline, lack of GitLab deprives many teams of this solution.
- Better docs for Development services — very few implementations, not many good examples of CodeBuild inside VPC, we spent most of the time figuring out this configuration.
Someone could say that the AWS services used in our solution are too primitive, that CodePipeline, CodeBuild or other AWS services that we know lack many functionalities. Remember, however, that this does not necessarily mean it will never change. AWS is still actively developing its solutions. For example, CodePipeline announced this month that it will transfer globally environment variables. Until recently, we could only configure variables from CodeBuild. It is in our interest to report the demand for new features and feedback to AWS. In the end, we all want to use the most effective solutions :)
What are our plans for the future?
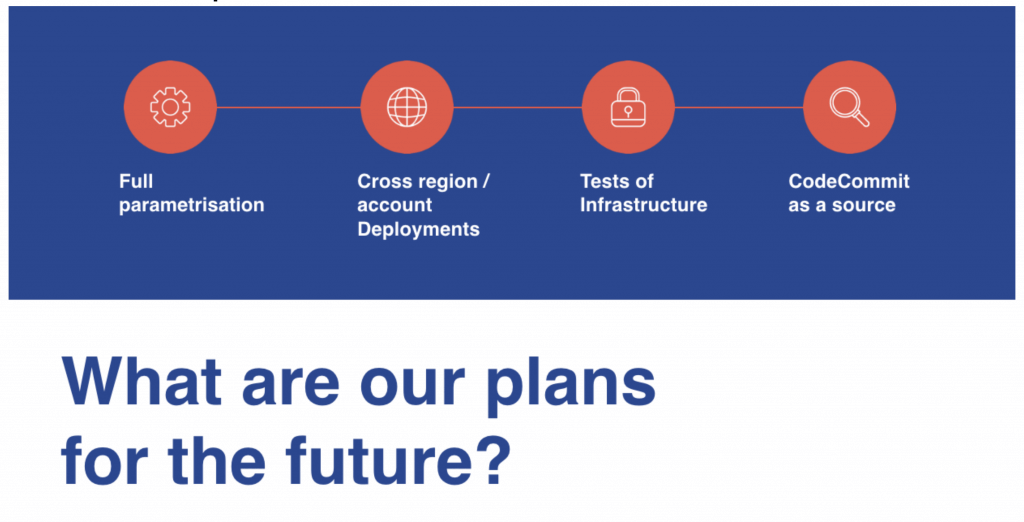
Despite the fact that the presented solution for the automation of the EC2 instance configuration is not finished, it allowed us to significantly speed up the work at a very low cost.
In the future, we plan at least the full parameterization of our pipeline and cross-region / cross-account deployment to reduce the number of pipelines. Moreover, we want to test infrastructure to increase reliability but also for security reasons, for we would like to use a private control version system, like AWS CodeCommit, as a source. It allows greater granulation of access rights to specific repositories, branches, and Pull Requests, whereas, at the same time, GitHub grants permissions to all repositories within organisation. These are not all the changes, of course. Our demand will alter and grow over time. The main thing is to achieve all goals as effectively as possible, and that is what we have done.
