Permissions in AWS Organizations with organizational units and SCPs
Handling permissions in AWS Organizations managed with Terraform with proper multi-environment OUs and service control policies.
AWS Organizations
AWS IAM
Terraform
TypeScript
Since we already laid the foundation in the form of an AWS Organization accompanied by basic IAM groups and users in our previous article, our next step will be to create an organizational unit (OU) with two accounts in it.
An arganizational unit is essentially a container for your accounts and an easy way to group them logically. Moreover, as we’ll see later, we can attach policies at the OU level and all the accounts that belong to it will inherit them as well. Want to stop your admins from inadvertently shutting down your Direct Connect or perhaps from spinning up a certain kind of instances? You can easily enforce that with OU level policies: the so-called service control policies (SCPs).
At the OU level, you can also enable trusted access for certain AWS services, such as AWS IAM Identity Center, which you can utilize if you decide to allow your users to log in using their corporate credentials. Furthermore, you can enable tag policies via AWS Organizations. Basically, these policies dictate how resources must be tagged under given OU in order to be compliant.
Creating an organizational unit with two accounts in it
Okay, let’s start by – you’ve guessed it – making a module for OUs:
resource "aws_organizations_organizational_unit" "ou" {name = var.nameparent_id = var.parent_id}
variable "name" {description = "Per Terraform docs: 'The name for the organizational unit'"}variable "parent_id" {description = "Per Terraform docs: 'ID of the parent organizational unit, which may be the root'"}
output "id" {description = "Per Terraform docs: 'Identifier of the organization unit'"value = aws_organizations_organizational_unit.ou.id}
Next, a module for an AWS account:
resource "aws_organizations_account" "account" {name = var.nameemail = var.emailparent_id = var.parent_idrole_name = var.role_name# There is no AWS Organizations API for reading role_namelifecycle {ignore_changes = [role_name]}}
variable "name" {description = "Per Terraform docs: 'A friendly name for the member account. "}variable "email" {description = "Per Terraform docs: 'The email address of the owner to assign to the new member account. This email address must not already be associated with another AWS account.'"}variable "parent_id" {description = "Per Terraform docs: 'Parent organizational unit ID or Root ID for the account. Defaults to the Organization default Root ID. A configuration must be present for this argument to perform drift detection.'"}variable "role_name" {description = "Per Terraform docs: 'The name of an IAM role that Organizations automatically preconfigures in the new member account. This role trusts the master account, allowing users in the master account to assume the role, as permitted by the master account administrator. The role has administrator permissions in the new member account. (...)'"type = stringdefault = null}
Finally, let’s create an OU with two accounts in it by adding the following lines to our aws-organizations-example/main.tf:
module "ou-1" {source = "./organizations-organizational_units"name = "ou-1"parent_id = module.root.roots.0.id}locals {role_name = "adminAssumeRole"}module "account-dev" {source = "./organizations-accounts"name = "account-dev"email = "YOUR_EMAIL+account-dev@YOUR_DOMAIN.TLD"parent_id = module.ou-1.idrole_name = local.role_name}module "account-prod" {source = "./organizations-accounts"name = "account-prod"email = "YOUR_EMAIL+account-prod@YOUR_DOMAIN.TLD"parent_id = module.ou-1.idrole_name = local.role_name}
Once that’s done, we need to terraform init the infrastructure we just updated:
➜ aws-organizations-example$ terraform initInitializing modules...- account-dev in organizations-accounts- account-prod in organizations-accounts- ou-1 in organizations-organizational_units# (...)Terraform has been successfully initialized!# (...)
… followed by terraform plan:
➜ aws-organizations-example$ terraform plan# (...)An execution plan has been generated and is shown below.Resource actions are indicated with the following symbols:+ createTerraform will perform the following actions:# module.account-dev.aws_organizations_account.account will be created+ resource "aws_organizations_account" "account" {+ arn = (known after apply)+ email = "ameotoko1+account-dev@gmail.com"+ id = (known after apply)+ joined_method = (known after apply)+ joined_timestamp = (known after apply)+ name = "account-dev"+ parent_id = (known after apply)+ role_name = "adminAssumeRole"+ status = (known after apply)}# module.account-prod.aws_organizations_account.account will be created+ resource "aws_organizations_account" "account" {+ arn = (known after apply)+ email = "ameotoko1+account-prod@gmail.com"+ id = (known after apply)+ joined_method = (known after apply)+ joined_timestamp = (known after apply)+ name = "account-prod"+ parent_id = (known after apply)+ role_name = "adminAssumeRole"+ status = (known after apply)}# module.ou-1.aws_organizations_organizational_unit.ou will be created+ resource "aws_organizations_organizational_unit" "ou" {+ accounts = (known after apply)+ arn = (known after apply)+ id = (known after apply)+ name = "ou-1"+ parent_id = "r-deu2"}Plan: 3 to add, 0 to change, 0 to destroy.# (...)
And finally, terraform apply:
➜ aws-organizations-example$ terraform apply# (...)Apply complete! Resources: 3 added, 0 changed, 0 destroyed.# (...)
[!WARNING] An email address (email aliases are supported as shown in the example) can be associated with an AWS account only once, i.e. reusing the same email address for the creation of a different AWS account, even if the original one has long since been deleted, is impossible.
To close an AWS account that is part of an AWS Organization, you must first assure that it can be transformed into a standalone account.
To access either of the two newly created accounts you need to log in to your master account as a user with permissions allowing the sts:AssumeRole action on the adminAssumeRole role in your destination account.
(The admin_user_1, which we created earlier, being a member of the administrators group has such permissions.)
Once logged in, grab the number of the account to which you want to switch from AWS Organizations. Next, click on your username located in the upper-right corner of the screen to reveal a dropdown list similar to the one shown below:

You’ll be taken to the screen shown below. Click on the switch role button:

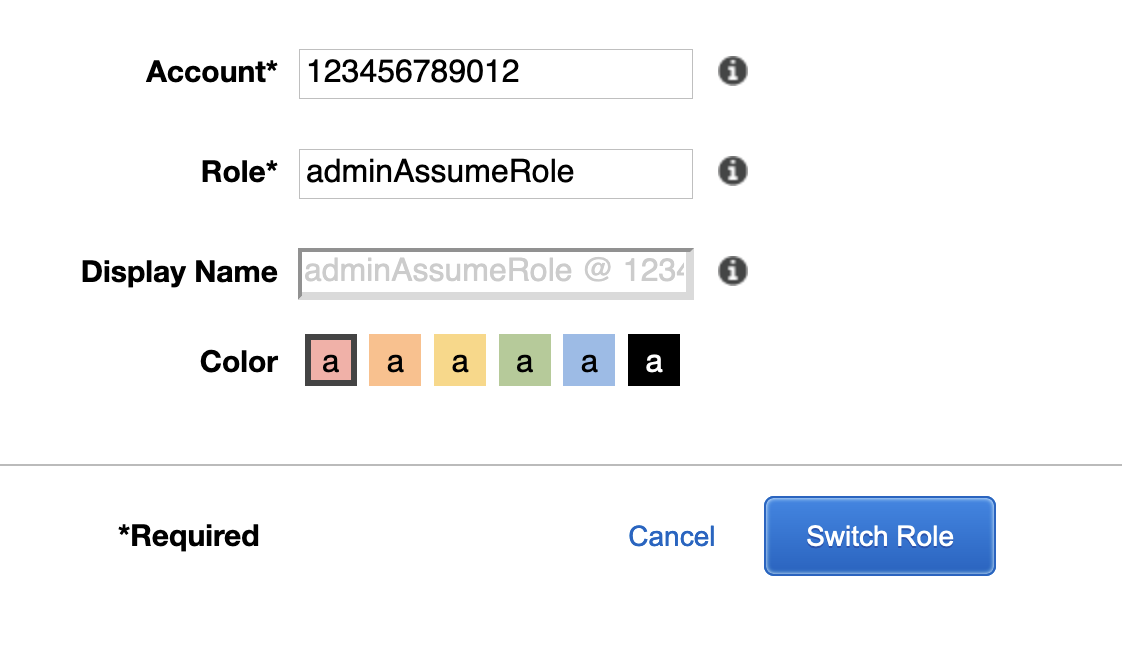
Finally, enter the account number you’ve copied earlier and the name of the role which you want to assume (adminAssumeRole in our case). Hit the blue button:

To log in to the other account you’ll need to go back to the master account, grab the second account’s number and repeat the steps given above.
As far as programmatic access via AWS CLI is concerned, all you need to do is configure your admin_user_1:
[admin_user_1]aws_access_key_id = AKIA57MNK6ZKUWMBKF5Daws_secret_access_key = YOUR_DECRYPTED_SECRET_ACCESS_KEY
And then create profiles referencing it:
[profile account-prod]role_arn = arn:aws:iam::YOUR_ACCOUNT-PROD_NUMBER:role/adminAssumeRolesource_profile = admin_user_1[profile account-dev]role_arn = arn:aws:iam::YOUR_ACCOUNT-DEV_NUMBER:role/adminAssumeRolesource_profile = admin_user_1
With the above set, you can use the CLI as follows:
➜ aws-organizations-example$ AWS_PROFILE=admin_user_1 aws sts get-caller-identity{"UserId": "AIDA57MNK6ZKR6OL2BKS7","Account": "YOUR_MASTER_ACCOUNT_NUMBER","Arn": "arn:aws:iam::YOUR_MASTER_ACCOUNT_NUMBER:user/users/admin_user_1"}➜ aws-organizations-example$ AWS_PROFILE=account-prod aws sts get-caller-identity{"UserId": "AROAUWT3K2MNKK3KIHBFA:botocore-session-1586498878","Account": "YOUR_ACCOUNT-PROD_NUMBER","Arn": "arn:aws:sts::YOUR_ACCOUNT-PROD_NUMBER:assumed-role/adminAssumeRole/botocore-session-1586498878"}➜ aws-organizations-example$ AWS_PROFILE=account-dev aws sts get-caller-identity{"UserId": "AROA27JRAFMNKW5S4W3MN:botocore-session-1586498917","Account": "YOUR_ACCOUNT-DEV_NUMBER","Arn": "arn:aws:sts::YOUR_ACCOUNT-DEV_NUMBER:assumed-role/adminAssumeRole/botocore-session-1586498917"}
Applying a service control policy (SCP)
Lastly, we’ll compose and attach an SCP blocking the root users of ou-1 OU’s accounts, both current and future ones, from taking any (or rather the majority as certain exceptions apply) actions, either via the console or programmatically. For inspiration on writing other SCPs, check out this webpage.
So, as usual, we’ll commence with a module:
resource "aws_organizations_policy" "policy" {name = var.namedescription = var.descriptioncontent = var.contenttype = var.type}resource "aws_organizations_policy_attachment" "attachment" {count = length(var.target_id)policy_id = aws_organizations_policy.policy.idtarget_id = var.target_id[count.index]}
variable "content" {description = "The content of the policy"type = string}variable "name" {description = "The name of the policy."type = string}variable "description" {description = "The description of the policy"type = string}variable "type" {description = "The type of the policy; either SERVICE_CONTROL_POLICY or TAG_POLICY"type = string}variable "target_id" {description = "The list of IDs of the targets to which the policy should be attached to; can be: the root account, an organizational unit or a non-root account"type = list(string)}
And we’ll invoke it as follows:
module "lock-down-root-user" {source = "./organizations-policies"name = "lock-down-root-user"description = "An SCP blocking the root user from taking any action, either via the console or programmatically"content = <<POLICY{"Version": "2012-10-17","Statement": [{"Action": "*","Resource": "*","Effect": "Deny","Condition": {"StringLike": {"aws:PrincipalArn": ["arn:aws:iam::*:root"]}}}]}POLICYtype = "SERVICE_CONTROL_POLICY"target_id = [module.ou-1.id]}
Now, on to the last dance:
➜ aws-organizations-example$ terraform initInitializing modules...- lock-down-root-user in organizations-policies# other outputTerraform has been successfully initialized!# other output➜ aws-organizations-example$ terraform plan# other outputAn execution plan has been generated and is shown below.Resource actions are indicated with the following symbols:+ createTerraform will perform the following actions:# module.lock-down-root-user.aws_organizations_policy.policy will be created+ resource "aws_organizations_policy" "policy" {+ arn = (known after apply)+ content = jsonencode({+ Statement = [+ {+ Action = "*"+ Condition = {+ StringLike = {+ aws:PrincipalArn = [+ "arn:aws:iam::*:root",]}}+ Effect = "Deny"+ Resource = "*"},]+ Version = "2012-10-17"})+ description = "An SCP blocking the root user from taking any action, either via the console or programmatically"+ id = (known after apply)+ name = "lock-down-root-user"+ type = "SERVICE_CONTROL_POLICY"}# module.lock-down-root-user.aws_organizations_policy_attachment.attachment[0] will be created+ resource "aws_organizations_policy_attachment" "attachment" {+ id = (known after apply)+ policy_id = (known after apply)+ target_id = "ou-deu2-jx8q5x1c"}Plan: 2 to add, 0 to change, 0 to destroy.# (...)
And finalize with terraform apply:
➜ aws-organizations-example$ terraform apply# (...)Apply complete! Resources: 2 added, 0 changed, 0 destroyed.Outputs:# (...)
Conclusion
In this article we have shown how the AWS Organizations service can be used to:
- automate the creation of accounts,
- group accounts together into organizational units,
- apply policies to these groups for additional governance.
One other important feature of AWS Organizations is Consolidated Billing, which is described in AWS documentation as follows:
You can use AWS Organizations to set up a single payment method for all the AWS accounts in your organization through consolidated billing.
With consolidated billing, you can see a combined view of charges incurred by all your accounts, as well as take advantage of pricing benefits from aggregated usage, such as volume discounts for Amazon EC2 and Amazon S3.
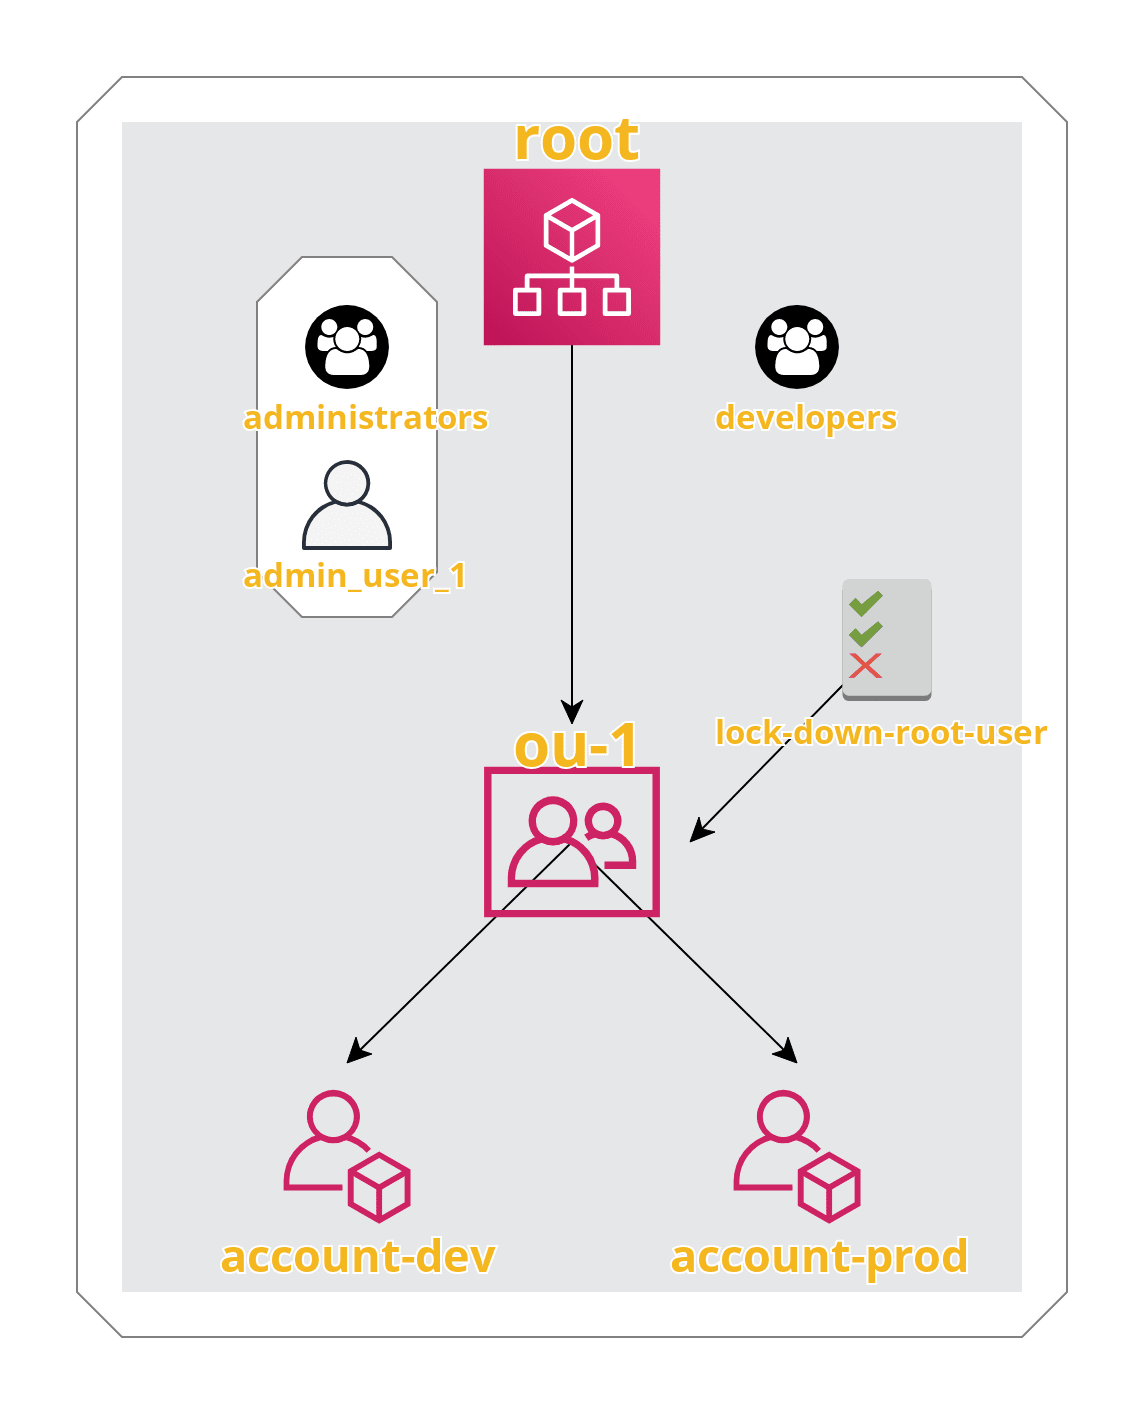
To recap, here’s what we’ve built:

And here’s the final file structure:
aws-organizations-example├── main.tf├── provider.tf├── terraform.tfstate├── terraform.tfstate.backup├── .terraform│ └── ... # Terraform's modules and plugins├── iam-groups│ ├── main.tf│ └── variables.tf├── iam-users│ ├── main.tf│ ├── outputs.tf│ └── variables.tf├── organizations│ ├── main.tf│ ├── outputs.tf│ └── variables.tf├── organizations-accounts│ ├── main.tf│ └── variables.tf├── organizations-organizational_units│ ├── main.tf│ ├── outputs.tf│ └── variables.tf├── organizations-policies│ ├── main.tf│ └── variables.tf
“That’s all Folks!” Hope you enjoyed the read and until next time!
