Building a snapshot retention mechanism for Amazon EBS volumes
A practical guide to dealing with backups of EBS volumes, including an introduction to the Serverless Framework.
Amazon EBS
AWS Lambda
AWS Systems Manager
Amazon DynamoDB
AWS Tools and SDKs
Boto3 (AWS SDK for Python)
Serverless Framework
Python
One of our clients needed some extra reliability and protection for their Amazon EBS volumes. There are a lot of solutions for that already out there — whether custom, or out-of-the-box within Amazon Web Services. but this was a good occasion to give the Serverless Framework a spin (as promised previously in my Cleaning up AWS services with automated workflows article), since we needed to perform some customizations for our clients, on top of what’s available out-of-the-box in the cloud ecosystem.
And we’ll do just that in this particle — armed with Python and AWS again, we are going to build a serverless snapshot and retention mechanism for EBS volumes, including some integrations with DynamoDB and Slack, and we’ll be orchestrating most of the deployment via Serverless Framework.
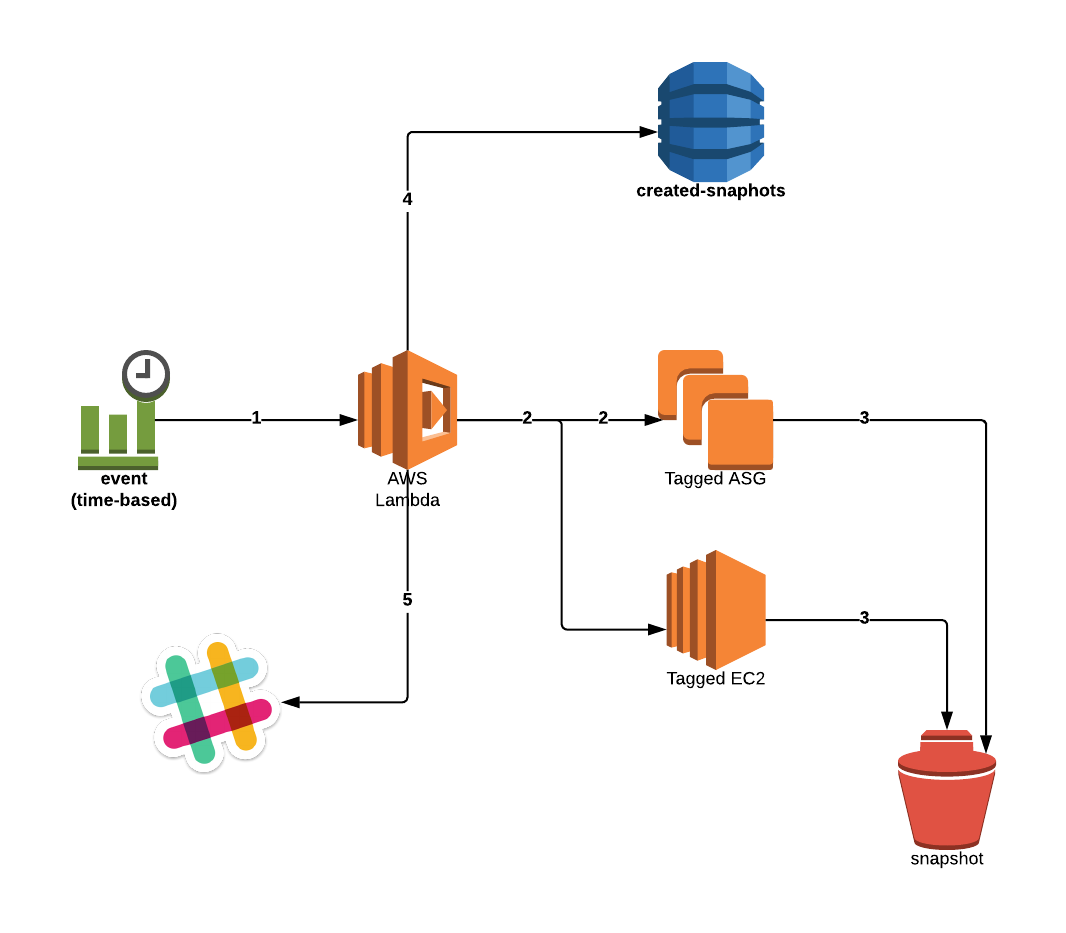
Based on a Cron event (we’ve changed that into an SSM Maintenance Window — I’ll describe that later) configured in CloudWatch Events a Lambda function gets invoked and creates snapshots of attached volumes — either of Auto Scaling Groups, or single instances, depending on the value of a tag passed along in the process.
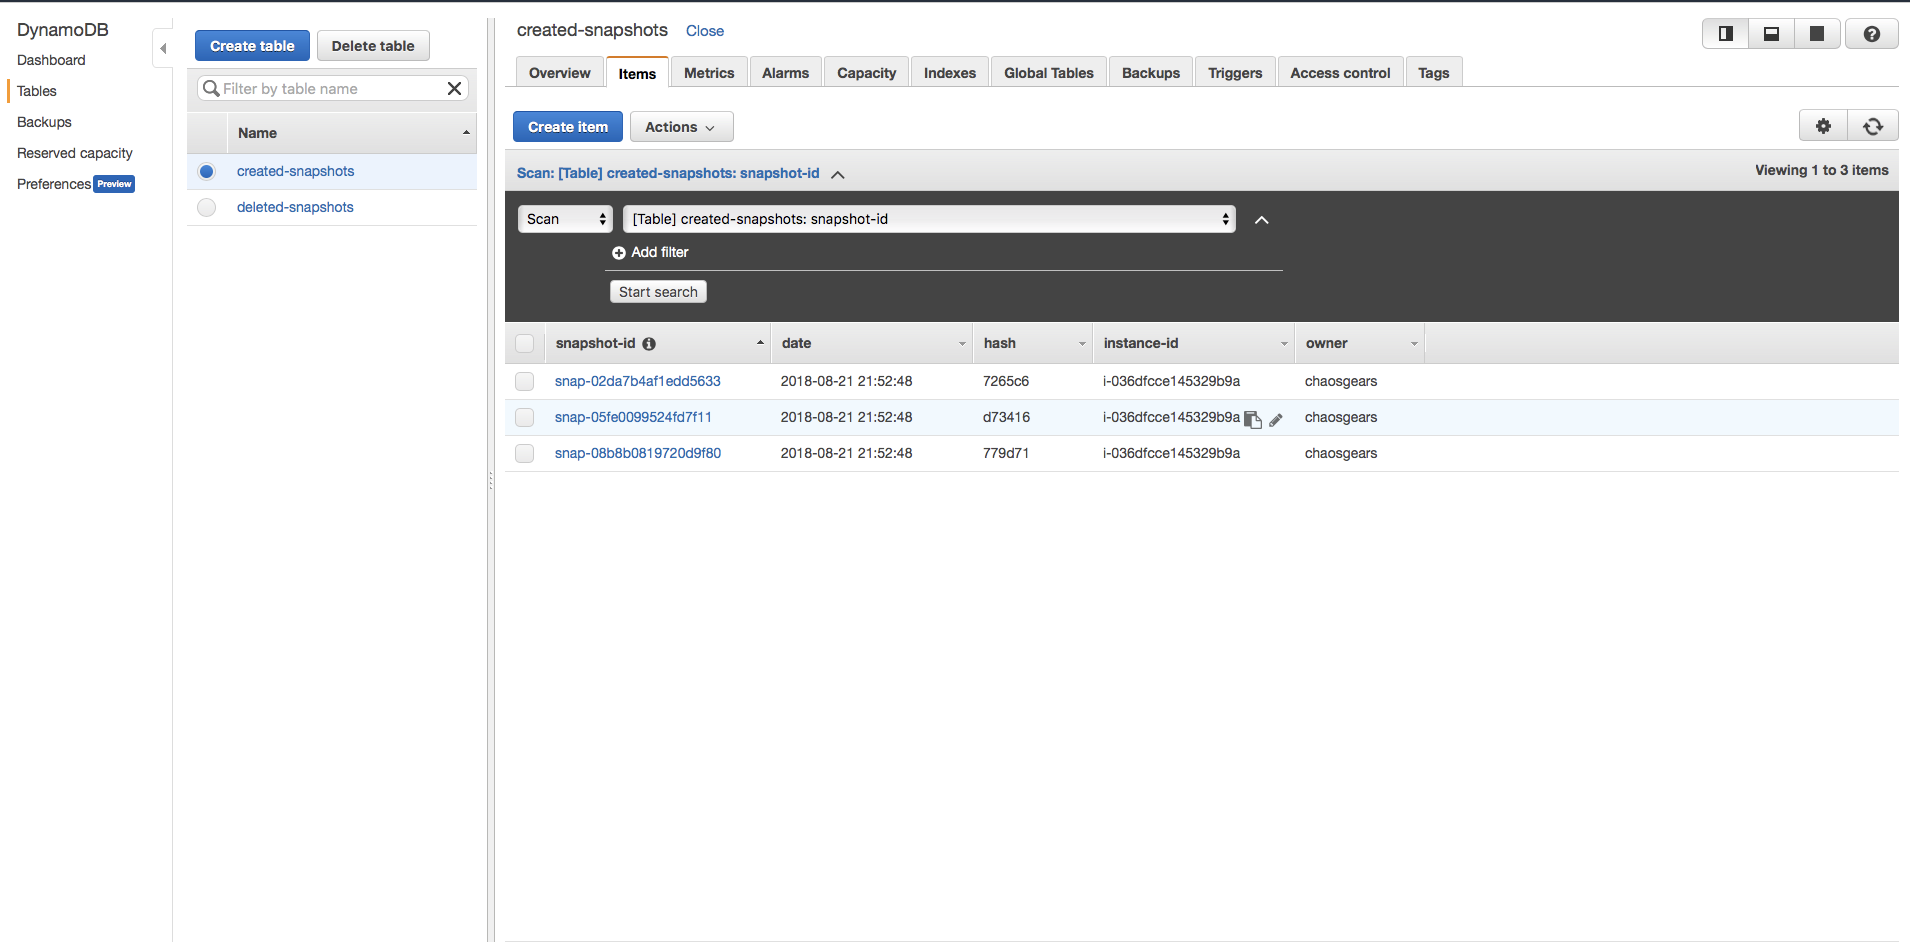
Once that is done, we save metadata about those snapshots in a DynamoDB table (created-snapshots, example below). In our case this served to keep track of events related to creating those snapshots.

Architecture of the serverless backup service for Amazon EBS volumes that we are building

Apart from the small bunch of information in DynamoDB, Lambda is putting a response into a CloudWatch logs like following:
{"Status": "SUCCESS","Reason": "See the details in CloudWatch Log Stream: 2018/08/21/[$LATEST]a1e01c47b0a44b79af9d26c8ea2b6979","Data": {"SnapshotId": ["snap-08b8b0819720d9f80","snap-02da7b4af1edd5633","snap-05fe0099524fd7f11"],"Change": true},"PhysicalResourceId": "2018/08/21/[$LATEST]a1e01c47b0a44b79af9d26c8ea2b6979"}
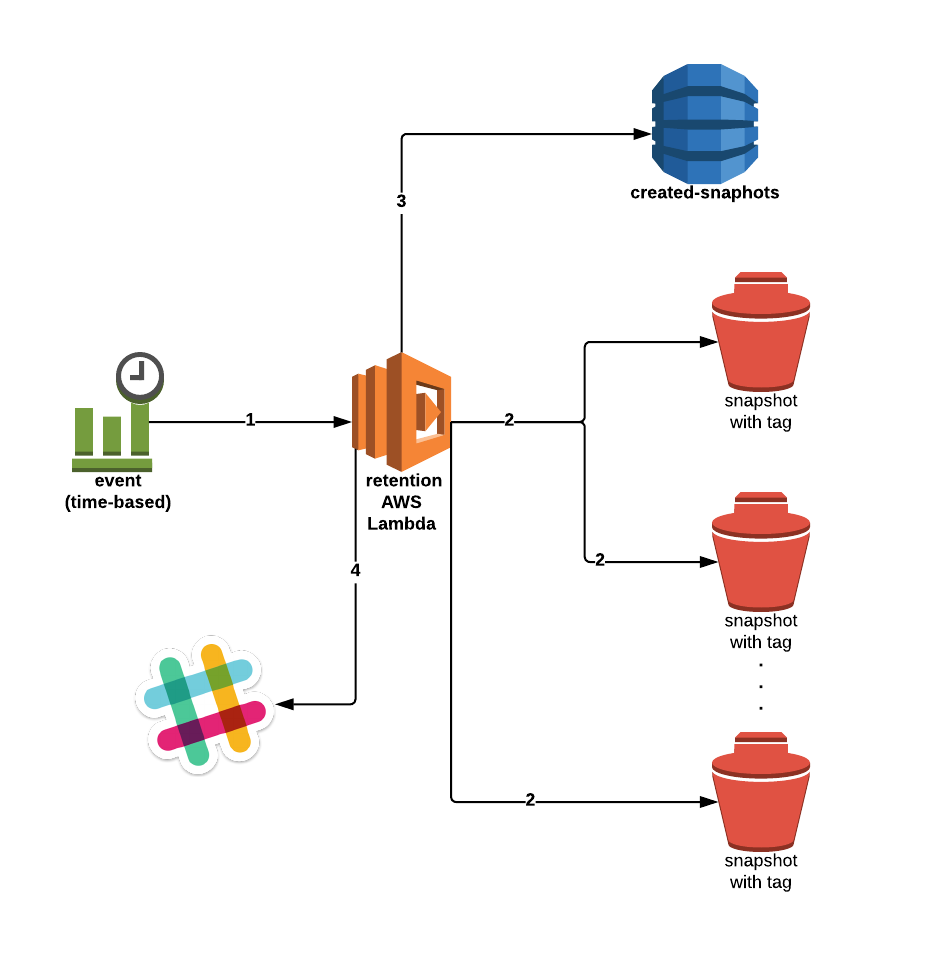
We then have some additional code focused on deleting snapshots, depending on a retention policy and a tag set by the snapshot Lambda. Periodically (as defined via CloudWatch Events) the Lambda checks the DeleteOn value we stored (in snapshot metadata) in order to determine whether it’s time to, well, delete it.


We’ve glanced at the general concept behind the solution, but I’d like to talk a little bit about a fundamental change in our approach to the deployment of serverless code.
Getting started with Serverless Framework
In my previous article, I hinted about a viable replacement for AWS CloudFormation as far as Lambda deployments on AWS are concerned. To put it simply — for projects built primarily on Lambdas (i.e. designed around a serverless compute architecture), I’ve started using Serverless Framework instead of AWS CloudFormation, because it makes it much easier and faster to launch an environment. It abstracts away several of the pain points involved otherwise.
We’ll be looking at how that looks and works in practice further down, but for now let’s stick to some basic info about the Serverless Framework itself.

The Serverless Framework consists of a command line interface and an optional dashboard, and helps you deploy code and infrastructure together on Amazon Web Services, while increasingly supporting other cloud providers. The Framework is a YAML-based experience that uses simplified syntax to help you deploy complex infrastructure patterns easily, without needing to be a cloud expert.
In my experience, it provides the easiest way to deploy your Lambda functions along with their dependencies and, of course, to invoke them. The Framework is first and foremost a Node CLI tool, which means we need Node and npm to install and run it.
npm install serverless -gThe CLI can then be accessed using the serverless command. To bootstrap your project and create some scaffolding for it, simply use…
serverless… which will start an interactive set-up prompt:
Serverless ϟ FrameworkCreate a new project by selecting a Template to generate scaffolding for a specific use-case.? Select A Template: …❯ AWS / Node.js / StarterAWS / Node.js / HTTP APIAWS / Node.js / Scheduled TaskAWS / Node.js / SQS WorkerAWS / Node.js / Express APIAWS / Node.js / Express API with DynamoDBAWS / Python / StarterAWS / Python / HTTP APIAWS / Python / Scheduled TaskAWS / Python / SQS WorkerAWS / Python / Flask APIAWS / Python / Flask API with DynamoDB(Scroll for more)
The number of templates available out of the box is extensive.
There are several (interactive) steps which follow afterward — ranging from choosing a name to deciding on auto-generating things like IAM roles. If you need some guidance during this, the framework’s documentation will be the best place to start.
Once your selected template in set up in your project directory, you should see something akin to:
-rw-r--r-- 497B handler.py-rw-r--r-- 2.8K serverless.yml
serverless.ymlcontains the definition of your environment: all the functions, variables, outputs, AWS services (…) that your project requires.handler.pycontains the actual Lambda code — that’s in our case, because the name and language is up to you.
The Serverless Framework translates all definitions in serverless.yml to a single AWS CloudFormation template which makes the whole process trivial. In other words, you’re defining the services you want to add in a sort of declarative way and the Framework then does its magic. To actual underlying process can be disassembled into:
- Your new CloudFormation template is born from
serverless.yml, - Stack gets created with additional S3 bucket for the ZIP archives of your Functions,
- Your functions get packaged (bundled) into said ZIP,
- The hashes of local files get compared to the hashes of files already deployed (if applicable),
- If those hashes are:
- identical, then the deployment gets cancelled (it’s a no-op),
- different, then your Lambda bundle gets uploaded to S3 (provisioned by the tool).
- Any additional AWS services — like IAM roles, Events etc. — get added to CloudFormation,
- The CloudFormation template gets updated with the respective changes.
Each deployment creates a new version for each Lambda function.
There’s much more information on the official website, of course. That said, we now know enough of the basics to roll up our sleeves and get back to the code.
The first part of the serverless.yml file contains general AWS environment configuration — along with custom variables, if needed (as in our case):
provider:name: awsruntime: python2.7region: eu-central-1memorySize: 128timeout: 60 # Optional, in secondsversionFunctions: truetags: # Optional service wide function tagsOwner: chaosgearsContactPerson: chaosgearsEnvironment: devcustom:region: ${opt:region, self:provider.region}app_acronym: ebs-autobackupdefault_stage: devowner: YOUR_ACCOUNT_IDstage: ${opt:stage, self:custom.default_stage}stack_name: basic-${self:custom.app_acronym}-${self:custom.stage}dynamodb_arn_c: arn:aws:dynamodb:${self:custom.region}:*:table/${self:custom.dynamodb_created}dynamodb_arn_d: arn:aws:dynamodb:${self:custom.region}:*:table/${self:custom.dynamodb_deleted}dynamodb_created: created-snapshotsdynamodb_deleted: deleted-snapshots
Tip: If you want to use a custom variable in another variable, use a pattern like: variable_a: {self:custom.variable_b}.
The really important part comes now, and it’s the functions section of our serverless.yml configuration. This is where you declare all the Lambda functions you’ve been creating for weeks.
Check out how simple it is in practice — with a couple of lines you’ll have configured environment variables, timeouts, event scheduling and even roles. And I’ve omitted obvious elements, like tags, names and descriptions.
functions:ebs-snapshots:name: ${self:custom.app_acronym}-snapshotsdescription: Create EBS Snapshots and tags themtimeout: 120 # Optional, in secondshandler: snapshot.lambda_handler# events:# - schedule: cron(0 21 ? * THU *)role: EBSSnapshotsenvironment:region: ${self:custom.region}owner: ${self:custom.owner}slack_url: ${self:custom.slack_url}input_file: input_1.jsonslack_channel: ${self:custom.slack_channel}tablename: ${self:custom.dynamodb_created}tags:Name: ${self:custom.app_acronym}-snapshotsProject: ebs-autobackupEnvironment: devebs-retention:name: ${self:custom.app_acronym}-retentiondescription: Deletes old snapshots according to rentention policyhandler: retention.lambda_handlertimeout: 120 # optional, in secondsenvironment:region: ${self:custom.region}owner: ${self:custom.owner}slack_url: ${self:custom.slack_url}input_file: input_2.jsonslack_channel: ${self:custom.slack_channel}tablename: ${self:custom.dynamodb_deleted}events:- schedule: cron(0 21 ? * WED-SUN *)role: EBSSnapshotsRetentiontags:Name: ${self:custom.app_acronym}-retentionProject: ebs-autobackupEnvironment: dev
Variables are presented as plain text and are easy to capture.
Obviously, hardcoding anything is a bad idea — as is storing sensitive data as plain text, especially in a file that will likely end up in a shared, version-controlled repository.
While the code above is just an example, we should still take care of those issues. An easy way to do that is called AWS Systems Manager Parameter Store. It’s an AWS service that can act as a centralized config and secrets storage for any and all of your applications.
First of all, you might use AWS CLI to store your new SSM parameters:
aws ssm put-parameter --name PARAM_NAME --type String --value PARAM_VALUE… and then simply reference your parameter with a ssm namespace:
environment:VARIABLE: ${ssm:PARAM_NAME}
As I am not a fan of hardcoding sensitive data into variables, I would rather use:
ssm = boto3.client('ssm')parameter = ssm.get_parameter(Name='NAME_OF_PARAM', WithDecryption=True)api_token = parameter['Parameter']['Value']
Having functions and variables configured, we can seamlessly jump into resources now. Those are simply additional CloudFormation resources that our solution depends on.
If you don’t want to keep resources defined in your serverless.yml file, you can reference an external YAML file containing your CloudFormation Resources definitions:
resources:- ${file(FOLDER/FILE.yml)}
With FOLDER/FILE.yml being that path to said file. In our case that file defines extra IAM roles and DynamoDB tables for our project’s environment.
Last but not least, we make use of a community plugin to automatically bundle our Python dependencies from requirements.txt and make them available in our PYTHONPATH.
plugins:- serverless-python-requirements
The time has come to deploy and launch your serverless project. Simply type:
serverless deploy --aws-profile YOUR_AWS_PROFILEAnd you should see something akin to:
Serverless: Installing requirements of requirements.txt in .serverless...Serverless: Packaging service...Serverless: Excluding development dependencies...Serverless: Injecting required Python packages to package...Serverless: Creating Stack...Serverless: Checking Stack create progress........Serverless: Stack create finished...Serverless: Uploading CloudFormation file to S3...Serverless: Uploading artifacts...Serverless: Uploading service .zip file to S3 (4.6 KB)...Serverless: Validating template...Serverless: Updating Stack...Serverless: Checking Stack update progress…
After a while you’ll get a final message confirming that your new stack has been deployed:
Serverless: Stack update finished...Service Informationservice: ebs-autobackupstage: devregion: eu-central-1stack: ebs-autobackup-devapi keys:Noneendpoints:Nonefunctions:ebs-snapshots: ebs-autobackup-dev-ebs-snapshotsebs-retention: ebs-autobackup-dev-ebs-retentionServerless: Publish service to Serverless Platform...Service successfully published! Your service details are available at:https://platform.serverless.com/services/YOUR_PROFILE/ebs-autobackup
After you check that everything has been launched properly you’re able to invoke your deployed function directly via a serverless call:
serverless invoke -f FUNCTION_NAMESome additional arguments you might use:
–type/-t: The invocation type. One ofRequestResponse,EventorDryRun. Defaults toRequestResponse.–log/-l: If true and invocation type isRequestResponse, it will output logging data of the invocation. Defaults tofalse.
Deleting all of it is as simple as…
serverless remove --aws-profile AWS_PROFILE…and the Framework will take care of the rest.
With all of that out of the way, I have to state: Serverless Framework has literally made my day. The deployment of new Lambda functions, even with extra AWS services, is extremely easy.
Of course, the devil’s in the details, and you will encounter some rougher edges as your use cases become more complex. Nonetheless, I strongly encourage you to test it — I am quite certain that you’re going to love it.
Next, let’s talk a bit about the actual Lambda code to tackle the problem we set out to solve in the first place — creating and appropriately retaining snapshots of Amazon EBS volumes.
Creating Amazon EBS snapshots
In snapshot.py, we start out with our actual Lambda handler as the entry to our execution flow.
def lambda_handler(event, context):region = os.environ['region']owner = os.environ['owner']slack_url = os.environ['slack_url']file = os.environ['input_file']slack_channel = os.environ['slack_channel']tablename = os.environ['tablename']ec2 = Volumes('ec2', region, event, context)ec2.create_snapshot(owner, slack_url, file, slack_channel, tablename)
We pull most of our inputs from the environment, to avoid hardcoding (remember about the Twelve-Factor App principles). While the handler itself does not currently use them, event and context are, of course, part of the Lambda signature.
eventrepresents the actual event which triggered the function. On the wire inside Lambda it is represented as a JSON object, but in Python code we get to deal with it as a dictionary straight away. In this particular case, it was an empty dictionary, but if you were using API Gateway, then you’d get access to — amongst others — the entire HTTP request which triggered the Lambda.contextcontains meta information about the invocation. The moment you start debugging your function, you’ll find this context very useful.
The Volumes class instantiated in our handler has a create_snapshot() method with the following signature:
def create_snapshot(self, owner, slack_url, file, slack_channel, tablename=’created-snapshots’)It is responsible for creating snapshots of all EBS volumes attached to instances with a specific tag. Then it tags the given snapshot with the respective DeleteOn date, to help out our retention Lambda in determining what it needs to do — and when.
A simple determine_snap_retention() function sums up today’s date with the number of days a newly created snapshot should be retained. The result is the date we are meant to delete the snapshot on:
def determine_snap_retention(retention_type='monthly',mdays=21, wdays=7):d_today = datetime.datetime.today()d_today = d_today.replace(hour=23, minute=0, second=0, microsecond=0)snapshot_expiry = ""while d_today.weekday() != 4:d_today += datetime.timedelta(1)if retention_type == 'monthly':snapshot_expires = d_today + timedelta(days=mdays)snapshot_expiry = snapshot_expires.strftime('%Y-%m-%d %H:%M:%S')elif retention_type == 'weekly':snapshot_expires = d_today + timedelta(days=wdays)snapshot_expiry = snapshot_expires.strftime('%Y-%m-%d %H:%M:%S')return snapshot_expiry
As an extra feature, create_snapshot() also puts snapshot metadata into a DynamoDB table and then notifies us on Slack via:
from slack_notification import slack_notify_snapdef slack_notify_snap(slack_url, file, channel, snap_num, region, snap_ids, owner):snap_ids = ', '.join(snap_ids)slack_message = custom_message(filename=file, snapshot_number=snap_num, snapshot_ids=snap_ids, region=region, owner=owner)try:req = requests.post(slack_url, json=slack_message)if req.status_code != 200:print(req.text)raise Exception('Received non 200 response')else:print("Successfully posted message to channel: ", channel)
Purging stale EBS snapshots
Following the same methodology, we have a dedicated class for dealing with deletions.
Therein, delete_old_snapshots() pulls snapshot metadata from DynamoDB and then compares the current date with the one assigned to the DeleteOn tag. If the snapshot expired — i.e. the current date is greater than or equal to DeleteOn, we remove it.
Once all existing snapshots are processed in this manner, we sum up the job by writing the IDs of the snapshots we deleted, if applicable, to a separate DynamoDB table and finish up with a notification to our Slack channel.
def delete_old_snapshots(self, owner, slack_url, file, slack_channel, tablename='deleted-snapshots'):delete_on = datetime.date.today().strftime('%Y-%m-%d')deleted_snapshots = []dynamo = Dynamodb('dynamodb', self.region)filters = [{'Name': 'owner-id','Values': [ owner ]}, {'Name': 'tag-key','Values': [ 'DeleteOn' ]}]try:snapshot_response = self.client.describe_snapshots(Filters=filters, OwnerIds=[owner])['Snapshots']for snap in snapshot_response:for i in snap['Tags']:if i['Key'] == 'DeleteOn':date = i['Value'][:10]if time.strptime(date,'%Y-%m-%d') == time.strptime(delete_on,'%Y-%m-%d') or time.strptime(delete_on,'%Y-%m-%d') > time.strptime(data,'%Y-%m-%d'):print('Deleting snapshot "%s"' % snap['SnapshotId'])deleted_snapshots.append(snap['SnapshotId'])self.client.delete_snapshot(SnapshotId=snap['SnapshotId'])elif time.strptime(delete_on,'%Y-%m-%d') < time.strptime(date,'%Y-%m-%d'):print(str(snap['SnapshotId'])+' has to be deleted on %s. Now we keep it' % i['Value'])count = len(deleted_snapshots)if count > 0:dynamo.batch_write(tablename, deleted_snapshots, region=self.region)slack_notify_snap(slack_url=slack_url, file=file, channel=slack_channel, snap_num=len(deleted_snapshots), snap_ids=deleted_snapshots, owner=owner, region=self.region)sendResponse(self.event, self.context, 'SUCCESS', {'SnapshotId': deleted_snapshots,'Changed': count})
Finale
Of course, there are out-of-the box solutions available — but I felt it was worth going through this nice lesson of implementing this flow almost from scratch and extending it with a few features that we wanted.
Some of the practices and patterns described here are quite frequently used by our team across all our projects — like keeping data outside the function in DynamoDB or another light entity, or notifying ourselves on Slack about different events coming from the AWS.
Moreover, we’re taking the next step towards becoming more comfortable with Serverless Framework which, in our case, has been become a primary choice in terms of serverless architectures deployments.
And my piece of advice: start using Serverless Framework if you consider yourself an enthusiast of infrastructure as code.
